From Blender to BabylonJS
Rédigé par V!nc3r 3 commentaires
(softwares used: Blender 2.79b, BabylonJS 3.3.0)
( version française disponible)
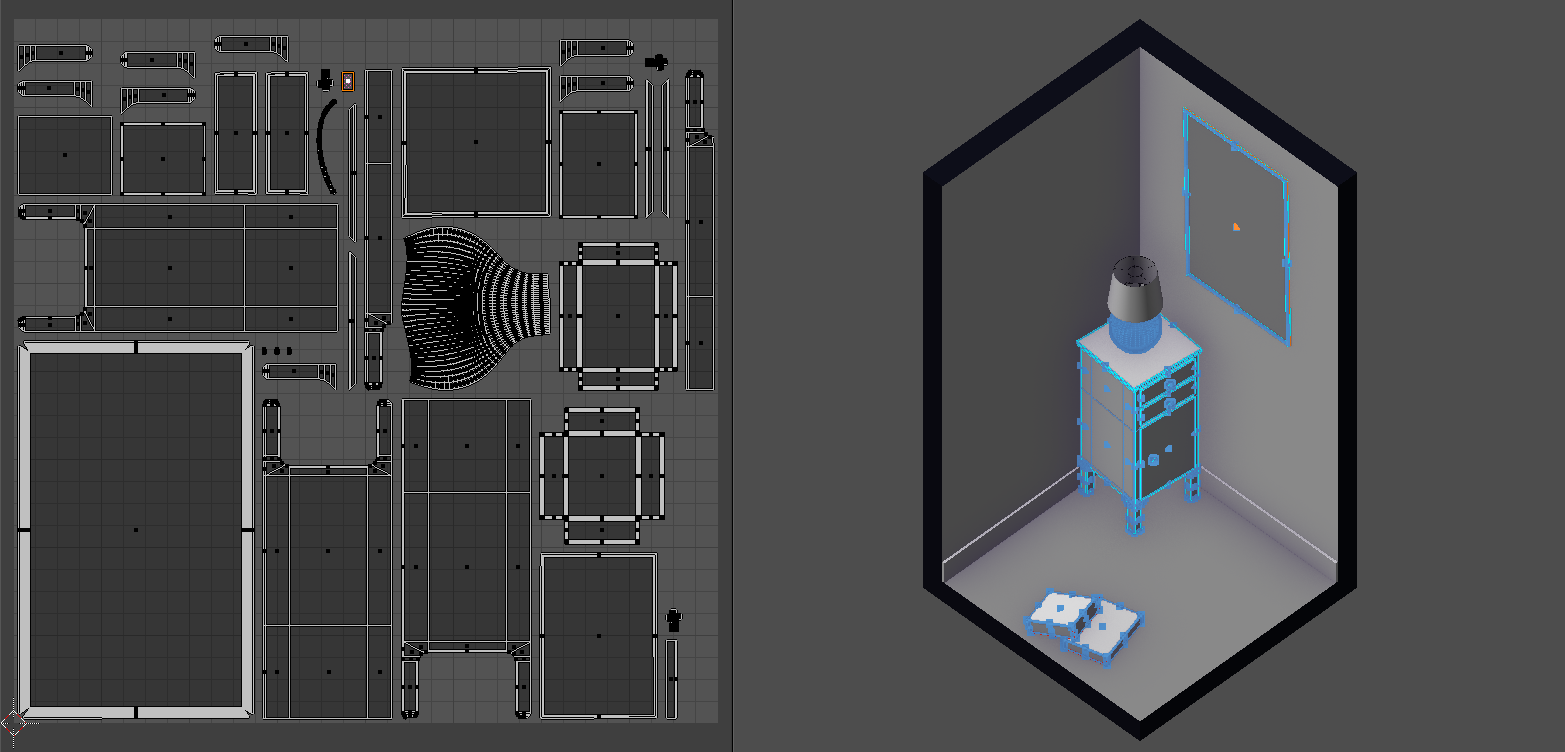
This article will use the excuse of a tiny scene to explain a simple workflow from Blender to BabylonJS, using lightmaps so as to tend to realistic lighting.
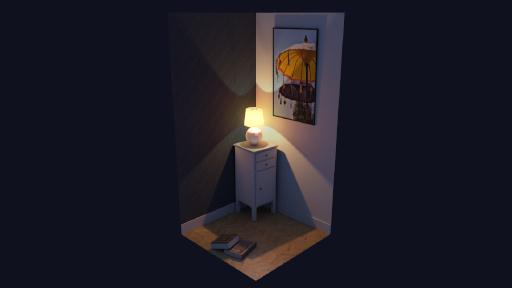
(click to launch)
direct link to demo
Non-Blender guys should be still interested by this tutorial, as modeling, unwrapping and organisation guidelines keeps the same in any modeler, and of course the BabylonJS (aka BJS) side is totally independant of the modeler used.
You will probably notice that english isn't my native language, do not hesitate to correct me :)
We're talking about webGL, so for artists used to well-known engine like Unreal Engine or Unity3D I might as well warn you now, some workflow details could chill you:
- 3D engine editing and tweaking tools are less accessible and user-friendly
- handle lighting through lightmaps file: old-school style, artist have to deal with more steps
- code! yes, we have to produce some javascript, in addition to a few bits of html/css (making a webGL app is the same as making a website after all)
Workflow in few words
Assets download
Project sources are available here. You will find inside:
- a 3D folder, holding blend files and raw textures
- a BJS folder, holding BabylonJS workspace and the tutorial examples
3D realtime basis
I will not dwell on modeling and texturing methodologies, which are the same no matter which engine you're using. I assume you already have these kinds of habits (non-exhaustive list):
- units in meters
- realtime modeling technique, obviously
- power of 2 textures sizes
- meticulous assets naming
You should of course took a look on BabylonJS Babylon 101 and How to... pages.
Standard vs PBR
In this example I'm not using PBR workflow but Standard one. This come from the fact that the official Blender-to-BabylonJS exporter doesn't yet handle PBR material exporting. Plus knowing how to work with Standard workflow still could be useful if we target no-so-high-end user hardware (not everybody have the lastest smartphone).
Note that you can export as PBR using glTF format, this workflow is still experimental but usable, this may be a subject for a next tutorial.
Lighting
As there isn''t raytracing engine inside BabylonJS, my lighting as to be made using a precomputed engine, like Cycles. This forces me to use two scene versions:
- the 3D realtime scene, which is the main production scene and from where the BJS scene is exported, with standards Blender Render materials
- the 3D precomputed scene, dedicated to lightmaps rendering, with Cycles materials and lights
BabylonJS scene edition
BabylonJS devs give us an editor, but for now it have some limitations for a daily use, specificaly the fact that I can't export and reexport my .babylon/.gltf scene file without loosing my editor tweakings. It can be useful on small one-shot scenes, but in production mode you always have to tweak your scene between your modeler and your engine. But keep an eye on this editor, it's often updated.
I will tweaking as most as I can on Blender scene directly, and once on BJS I will use the Inspector tool to refine things, and save this tweaks... in javascript.
Optimisation
For this tutorial I will not going deeper in optimisation techniques, that's not the point so only minimum will be done. On a complex scene, don't forget every tiny bits of optimisation could be important (non-exhaustive list):
- meshes density (and so size) of objects
- textures size (can be reduced at the end of the project)
- number of dynamic lights
- thick unwrapping for lightmaps
- objects merging & materials sharing
Blender side
Realtime scene (Blender Render)
Scene organisation
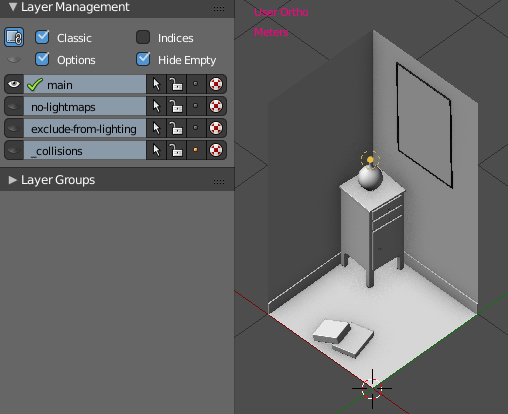
We work on a realtime project, so keep attention to naming to later make easier the code manipulation.
Objects are put in layers to make our life better.
Modeling
Nothing unusual here. Try to setup your seams and sharp edges when a mesh is done, to avoid have to come back on it later.
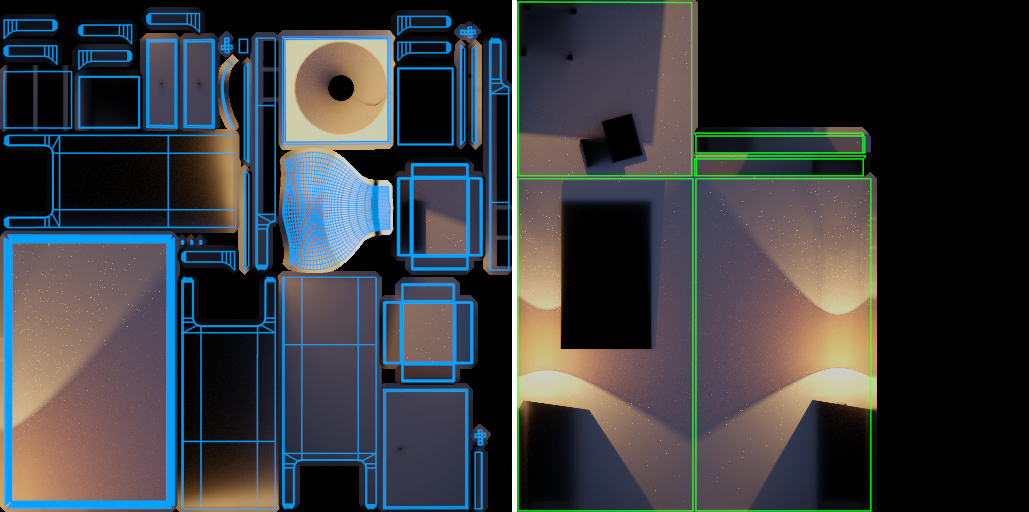
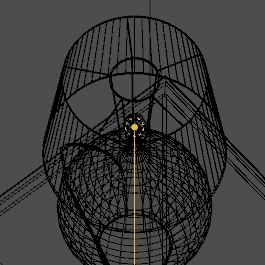
We have obviously unxrapped our commons UVs, but also the one dedicated to lightmaps:
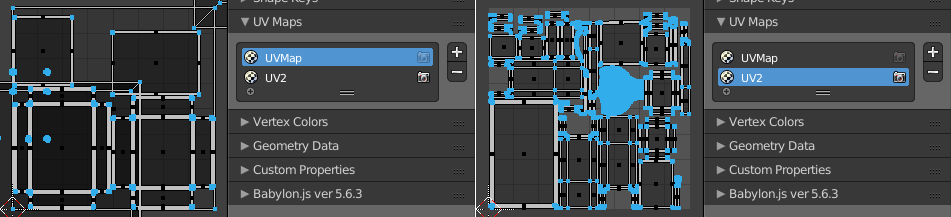
UVMap for texture tiling, UV2 for not-yet-existing lightmaps
Do not waste time on UV2 for now, we just have to check if the automatic unwrapping behave good (Unwrap or SmartUnwrap). UV1 can be definitive.
Lightmaps setup
Objects will be merged together, depending of how we want lightmaps to be used (this depends of each project), but we have to think about some points:
- if some objects use the same materials, we want them merged when possible
- if some objects doesn't need lightmaps, or even can be annoying when render time comes, they can be merged and named with an appropriate keyword to spot them once on the 3D engine
- note that you can be absolutely rigourous about lightmaps surface distribution, we can do maths to know how much texels we want - but on this tiny scene, following your feeling is enough
We have also the option to keep objects detached and to share UV2, but this make both Blender & BabylonJS workflow complicated.
- note the selected face on the UV layout: it's the backside of the poster, scaled to 0.05 because there is no need to use many lightmap pixels here
- we can notice some empties spaces: Blender plugins surely can help us to unwrap in a more efficient way
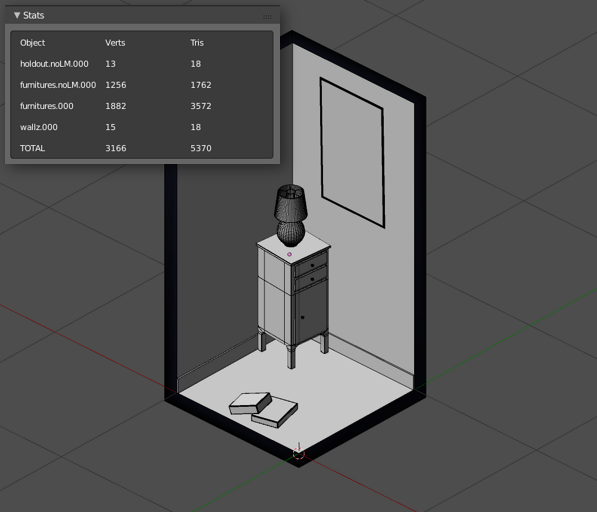
objects excluded from lightmaps, using the keyword noLM (for no LightMap): holdout.noLM.000 and furnitures.noLM.000
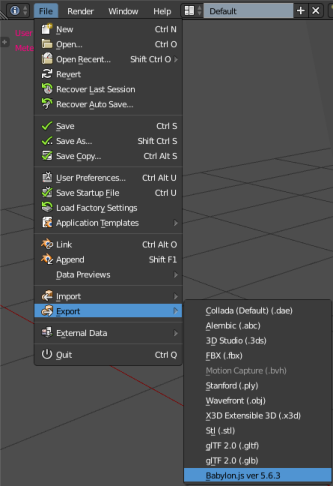
Scene export
At this stage it's already possible to make a first export to BabylonJS, even if our lightmaps still doesn't exists. You can read official doc' about exporter (I wrote some piece of words in it, do not hesitate expressing feedbacks on it).
If you don't already have BabylonJS scene prefab' on hand, don't forget the existence of the editor, or also the sandbox, which allow you to see your 3D in all angles in no time.
Export process isn't really complicated. As you've seen in the official doc', adjustments are in properties panel (for mesh, world, materials, etc).
This way we'll get an ugly rendering, but this can be useful to:
- spot potentials bugs and correct them before starting juggling between scenes
- start some tuning, but very basic because we're still have to set up our scene mood (and our lightmaps)
raw export from Blender to BabylonJS Sandbox
Precomputed scene (Cycles)
When our realtime scene is ready, it's time to see the light. The focus here will be on lighting and not on materials. Actually, we're going to overwrite most of our materials with a very basic and simple one.
Objects
First step in our new empty Cycles scene is obviously to append our objects in it.
Few options are available, depending of your preferences:
- Ctrlc then Ctrlv, quick and efficient
File > Append, which may be interestingFile > Linkwhich may be the perfect way, but I still doesn't get the ideal trick to use it- for curious, the strongest lead to follow should be to link Cycles materials using object level instead of its data (or vice-versa), but my Baketool plugin doesn't seem to like it
In case you're updating the Cycles scene, you already have old objects versions. Before importing new ones, delete the oldest and don't forget to purge Orphan Data through the Outliner.
Once again, layer organisation have its importance, with some roles assigned:
- lightmapped objects, which could be updated from time to time
- objects used for rendering, but not receiving lightmaps (lampshade for example)
- lights and cameras
Materials
Since for baking we only need light impact, we don't have to convert all our Blender Render materials to Cycles ones. On a tiny scene like this one, it's still conceivable but on a huge scene containing hundreds of materials there's enough to pull your hairs out - especially if you have to update your geometry three days later.
That's why we're going to create a default Cycles material, simple, named for example _cycles_default_:
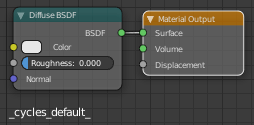
To avoid loose it during an Orphan Data cleaning, we set it as Fake User.
Then we can overwrite and assign it on all our objects, thanks to the Material Specials (default) addon: ShiftQ > Assign Material > _cycles_default_
Yep, but what about the color bleeding? Indeed, we lose it completely with this technique. So we can target strategic elements and apply to them specific materials. In this example scene, I've choose the wooden floor ; but this material is still very simple, consisting of the diffuse texture simply linked to the Diffuse BSDF shader.
You may appreciate a short video of the process:
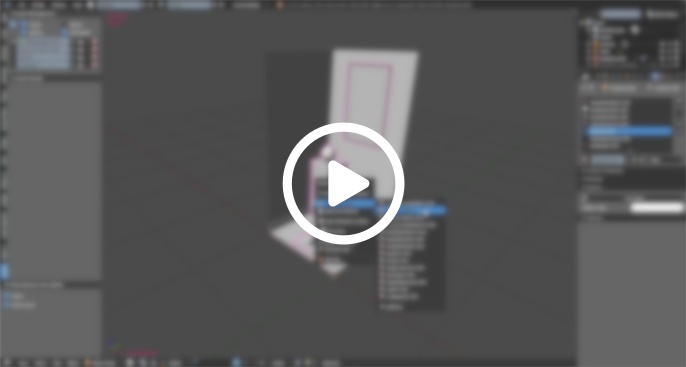
direct link to video
Lighting
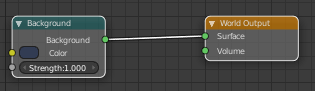
World output coudn't be easier to make, but it's enough for this scene:
Light isn't arduous:

However, by placing the light in its logical place (in the middle of the light bulb), an issue comes: light doesn't travel through bulb and lampshade.
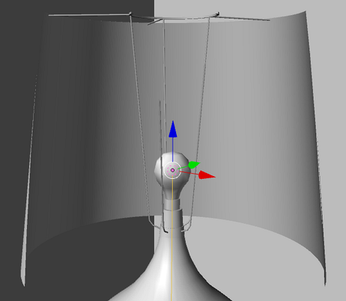
For the bulb, problem is quickly solved, we just have to use a Transparent shader. For the lampshade, we just want transparency too but with a color similar to the lampshade fabric color we want:
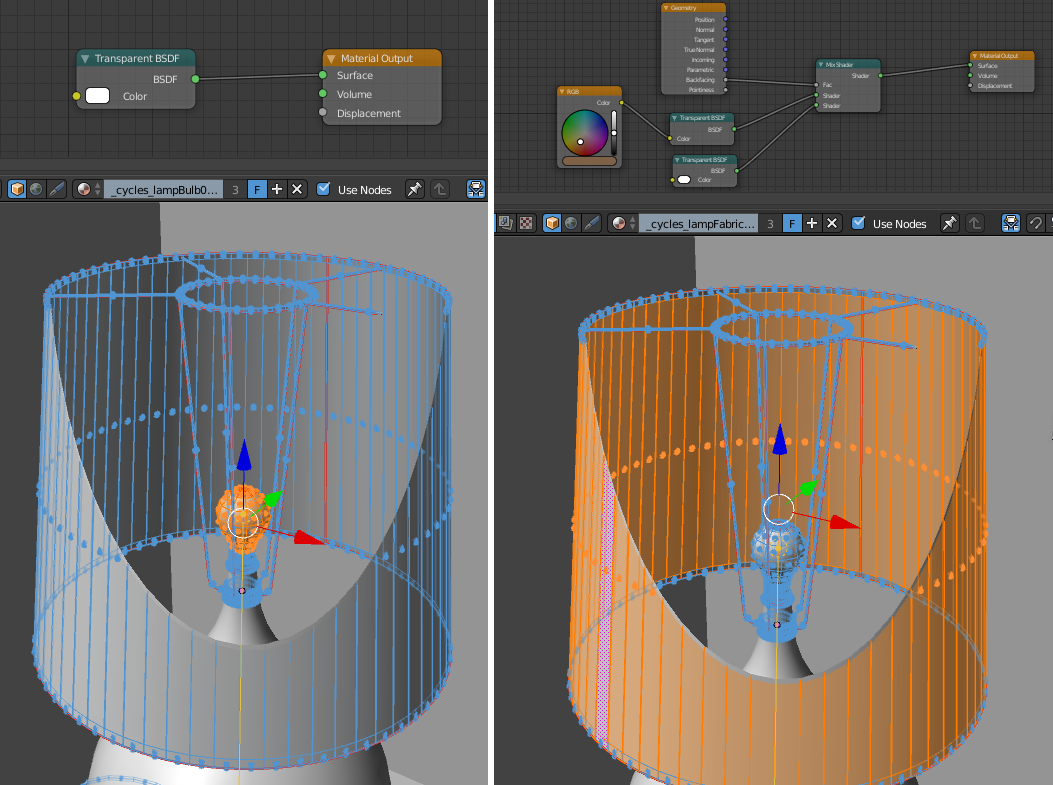
Note that Fake User is checked on these materials, allowing to not loose them during meshes updating
To reduce render noise, check official Blender doc'
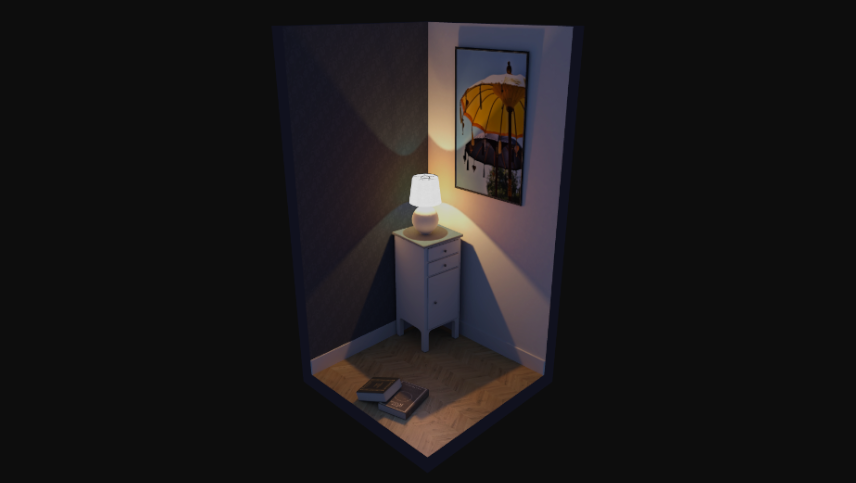
We now have a nice lighting, time to go to the lightmaps baking step!

Baking
I use the Baketool addon, easy to use. You will find some other addOns at the end of this page. If you need default Blender baking workflow, check the official doc'.
Get your objects list and bake on the second UV channel.
The main point here is to bake the Diffuse pass without the Color option. Indeed, we just need direct and indirect lighting, nothing more.
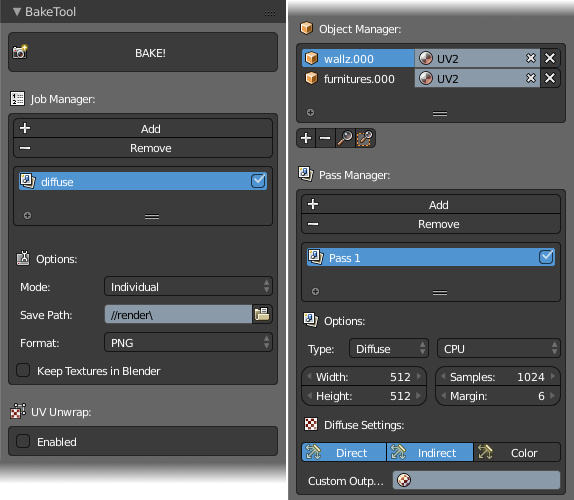
Baketool setup
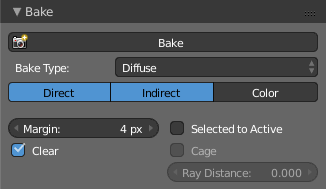
FYI, default Blender baking setup
Render!
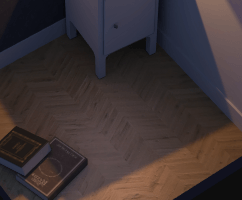
look at this wonderful empty lost space on the wall lightmap, boo me
We can accept few noise on our lightmaps (as baking take much more time than a regular render), and then apply a denoise pass:

denoise on Gimp
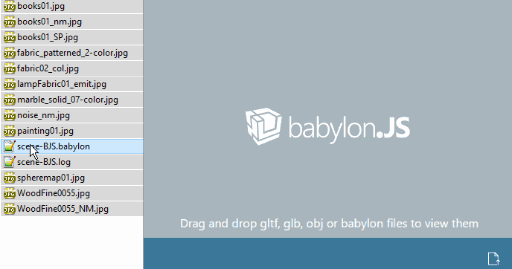
Save your lightmaps files on BJS/assets/lightmaps/ folder.
BabylonJS side
As seen above, you may don't bother yourself with code, by using the official editor. Just be sure to not have to reexport and so reimport your scene file.
Note that you need a web server. You will find some tips here.
But this tutorial will start from scratch. Nevertheless, if you're not comfortable with coding, copy-paste way is often possible. Note that I'm not a developper so my code is probably not optimal.
Prefer using your browser in private mode to avoid cache issues, and always show the console (you can even setup your console to always disable cache when opened).
Scene export/import
To avoid mess in our app root folder, we need a file tree:
| File tree | Function |
|---|---|
 |
|
You can already export the babylon file in the assets folder, textures will be copied automatically. Put your lightmaps files in their folder.
Rather than use the online version of BabylonJS file, it's often better to use a local version (downloaded in js folder). For this tutorial we will write our javascript in our main html file, but it should be cleaner to use the js folder too.
index.html is the place where everything will happens. Start to create an empty file named as index.html, then edit it.
Always with the help of the official BJS doc', we're quick going to our first scene loading:
<!doctype html>
<html>
<head>
    <title>From Blender to Babylon - standard workflow</title>
    <meta charset="UTF-8">
    <script src="https://www.nothing-is-3d.com/js/babylon.js"></script>
    <style>
        html, body {
            overflow: hidden;
            width: 100%;
            height: 100%;
            margin: 0;
            padding: 0;
            font-family: tahoma, arial, sans-serif;
            color:white;
        }

        #canvas {
            width: 100%;
            height: 100%;
            touch-action: none;
        }
    </style>
</head>
<body>
    <canvas id="canvas"></canvas>
    <script type="text/javascript">
        var canvas = document.getElementById("canvas");
        var engine = new BABYLON.Engine(canvas, true);
        var scene = new BABYLON.Scene(engine);
        // ArcRotateCamera doc, you can use FreeCamera if you prefer:
        // http://doc.babylonjs.com/api/classes/babylon.arcrotatecamera#constructor
        var arcRotCam = new BABYLON.ArcRotateCamera(
            "arcRotateCamera", 1, 1, 4,
            new BABYLON.Vector3(0, 1, 0),
            scene
        );
        arcRotCam.attachControl(canvas, true);

        // SceneLoader doc :
        // http://doc.babylonjs.com/api/classes/babylon.sceneloader#append
        BABYLON.SceneLoader.Append(
            "assets/",
            "scene-BJS.babylon",
            scene
        );

        engine.runRenderLoop(function () {
            scene.render();
        });

        window.addEventListener("resize", function () {
            engine.resize();
        });
    </script>
</body>
</html>
In the <head> tag, nothing unusual: we tell where is the BabylonJS engine file, and we tell the browser that we want our 3D part (canvas) takes all the whole page.
In the <body> tag our interest is on the function BABYLON.SceneLoader.Append which allows us to load our 3D. But before that, we had:
- instanciated the 3D engine
var engine = new BABYLON.Engine(canvas, true); - created a scene using this engine
var scene = new BABYLON.Scene(engine); - created a camera
Camera position values I've put here have to be tweaked. After looking in the doc', I make sure that:
- my spawn camera position is alright:
var arcRotCam = new BABYLON.ArcRotateCamera("arcRotateCamera", 5.5, 1.2, 3.75, new BABYLON.Vector3(-0.8, 0.75, 0.8), scene); - my mousewheel actions are smoother:
arcRotCam.wheelPrecision = 200; - my min camera clipping is tuned according to my scene scale:
arcRotCam.minZ = 0.005;( = 5 mm)
Here our first scene loading!
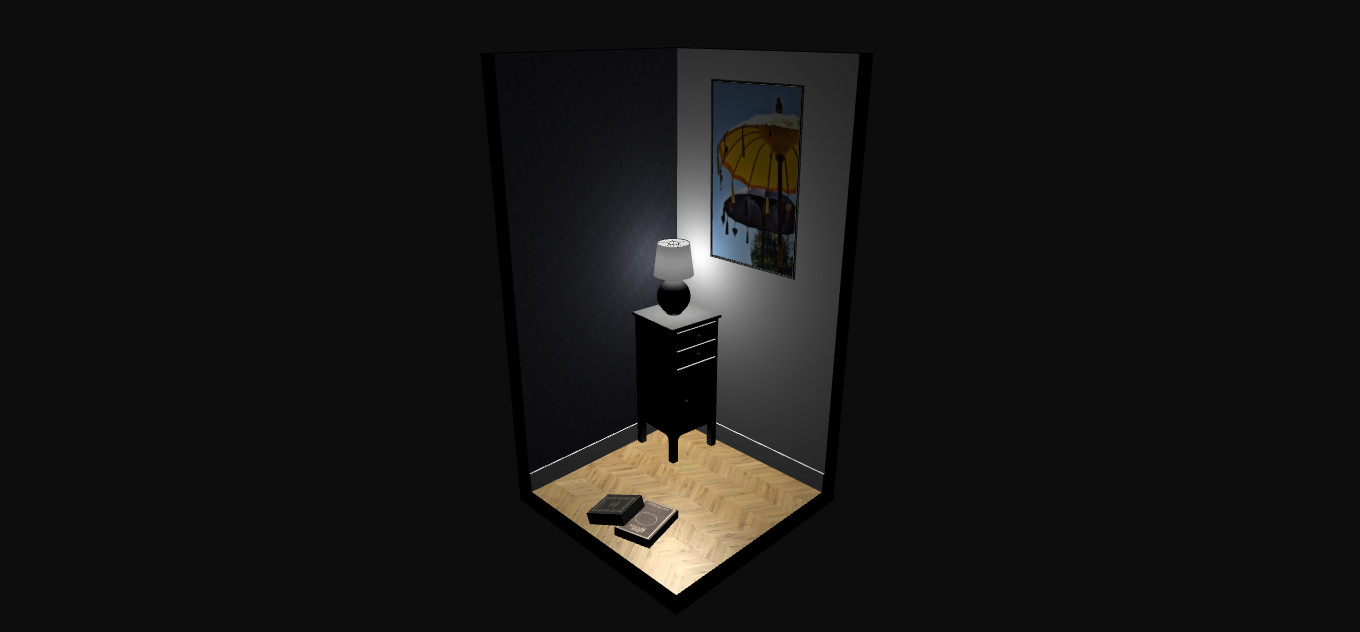
see tuto01.html
Before taking care of materials, we still have to handle lightmaps and assign them automatically to our objects.
Lightmaps
We're going to increase the difficulty a notch, because we'll need to:
- loop among our objects and exclude ones which doesn't get lightmaps
- loading lightmap files
- assign these lightmaps on the rights materials
- do basic material tweaking to ensure nice lightmap use
To be sure our objects exists when we call them, we need to be on the onSuccess of our SceneLoader. Below an example showing file loaded!when the .babylon is loaded:
BABYLON.SceneLoader.Append(
    "assets/",
    "scene-BJS.babylon",
    scene,
    function(){
        console.log("file loaded!")
    }
);
see tuto02.html (check the console)
So our bits of code will be on this function. But before the SceneLoader, I need a function dedicated to material lightmap assignation, named here assignLightmapOnMaterial:
function assignLightmapOnMaterial(material, lightmap) {
    material.lightmapTexture = lightmap;
    // we want using UV2
    material.lightmapTexture.coordinatesIndex = 1;
    // our lightmap workflow is a darken one
    material.useLightmapAsShadowmap = true;
}

BABYLON.SceneLoader.Append(
    "assets/",
    "scene-BJS.babylon",
    scene,
    function () {
        /** LIGHTMAP ASSIGNATION PROCESS **/
        // lightmapped meshes list
        var lightmappedMeshes = ["wallz.000", "furnitures.000"];
        // we start cycling through them
        for (var i = 0; i < lightmappedMeshes.length; i++) {
            var currentMesh = scene.getMeshByName(lightmappedMeshes[i]);
            // lightmap loading
            var currentMeshLightmap = new BABYLON.Texture(
                "assets/lightmaps/" + currentMesh.name + "_LM.jpg",
                scene
            );
            currentMeshLightmap.name = currentMesh.name + "_LM";
            // we start cycling through each mesh material(s)
            if (!currentMesh.material) {
                // no material so skipping
                continue;
            } else if (!currentMesh.material.subMaterials) {
                // no subMaterials
                assignLightmapOnMaterial(
                    currentMesh.material,
                    currentMeshLightmap
                );
            } else if (currentMesh.material.subMaterials) {
                // we cycle through subMaterials
                for (var j = 0; j < currentMesh.material.subMaterials.length; j++) {
                    assignLightmapOnMaterial(
                        currentMesh.material.subMaterials[j],
                        currentMeshLightmap
                    );
                }
            }
        }
        /** END OF LIGHTMAP ASSIGNATION PROCESS **/
    }
);
If you just want doing copy-paste without analysis, check only this part: var lightmappedMeshes = ["wallz.000", "furnitures.000"]; where you have to customize your lightmapped objects name.
Of course in a huge scene using tons of objects you can't manually set a list like that, but for this tutorial, automate this process would have been overcomplicated.

see tuto03.html
We quickly see something is wrong in our render. When we have setup the useLightmapAsShadowmap property in our lightmapped materials, we tell engine to multiply scene ambientColor with materials ambientColor. So if the scene ambient is gray, even if a material ambient is white, this will make it gray (clamped by scene ambient).
Consequently we set this scene ambient to white in our sceneLoader:
scene.ambientColor = BABYLON.Color3.White();
see tuto04.html
Dynamic lighting
You may have already set a pointLight inside Blender (do it, if not). This one is exported and already influence your materials, on diffuse & specular:
| Blender | BabylonJS |
|---|---|
 |
 |
Same as for materials, the more you set in Blender, the easiest it is. For more advanced tuning, you should understand how to do that once tut'materials part will be done.
Materials
To know all existing properties names, as usual... check the doc'. Don't forget settings which are already reachable through Blender.
So then, how to access to materials via javascript? First we're going to launch the Inspector tool, which will show us an UI with many scene properties.
We have to call this tool at the end of our sceneLoader function:
[...]

        }
        /** END OF LIGHTMAP ASSIGNATION PROCESS **/

        /* tools */
        scene.debugLayer.show();
    }
);

[...]
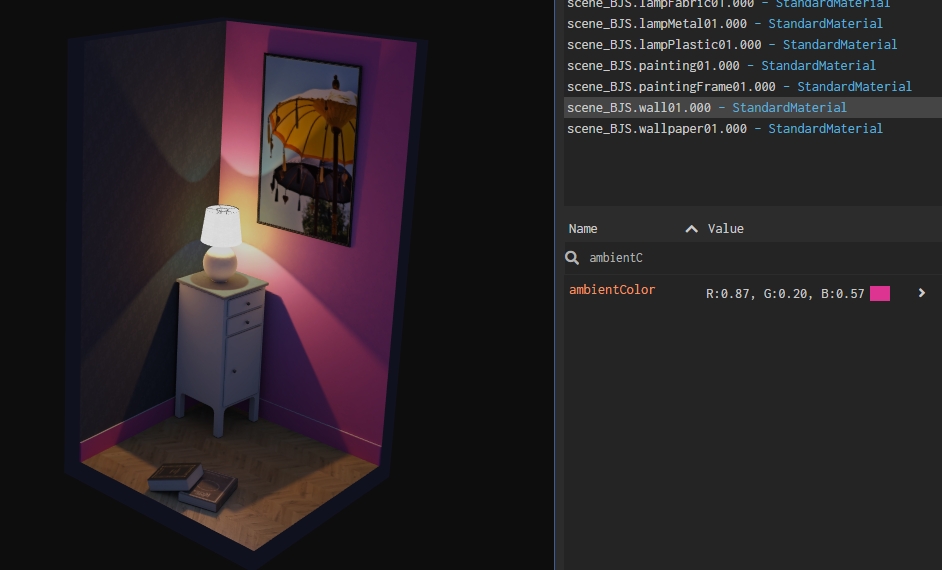
let's say we want our white wall turned to pink. We just have to go on the Material tab, find our material (use the Filter by name...), find our ambientColor property and tweak it.
Then your reload your page to check if it's saved... and here the drama: of course, our tweak is lost.
So it's time to create a javascript variable containing our material, and assign it our tweak:
[...]

        }
        /** END OF LIGHTMAP ASSIGNATION PROCESS **/

        var wall01Mtl = scene.getMaterialByName("scene_BJS.wall01.000");
        wall01Mtl.ambientColor = new BABYLON.Color3(0.87, 0.2, 0.57);

        /* tools */
        scene.debugLayer.show();
    }
);

[...]
Hop! We're good.
see tuto05.html
You're going to tell me "Hmm ok, but ambientColor could be set up without any difficulty inside Blender, isn't it?", and you'll be right, this example was just an easy-to-see one for this tut.
The process is exactly the same for any property, here I just checked the API about ambientColor and I can see BJS ask for a Color3, duly noted.
Let's imagine that I want to delete a lightmap on a specific material, and not on all the object?
scene.getMaterialByName("scene_BJS.wall01.000").lightmapTexture = null;
here I even don't created a variable, it's probably a bad practice
My normalMaps have been created for DirectX and not OpenGL?
for (var k = 0; k < scene.materials.length; k++) {
    scene.materials[k].invertNormalMapY = true;
}
here we loop inside all scene materials
Before ending this tutorial, a tiny trick to simulate reflections without loosing FPS: using a spheremap. This is an old-school technique which could give us cheap rendering if too strong, but on curved surfaces (like ceramic of our lamp) can do its job. Just take a screenshot of your BJS scene and apply it a spherical filter:
spherical filter from Gimp
Then inside Blender, assign this texture to your material and set the Mapping to Spherical.
Polishing
Touch support
To be sure touch devices could be targeted, we have to use a javascript library named PEP.
Download the minified version here, put it on the BJS/js/ folder and called it in the <head> tag.
You also have to write touch-action="none" in the <canvas>tag.
<!doctype html>

<html>

<head>

    [...]

    <script src="https://www.nothing-is-3d.com/js/babylon.js"></script>
    <script src="https://www.nothing-is-3d.com/js/pep.min.js"></script>

    [...]

</head>
<body>
    <canvas id="canvas" touch-action="none"></canvas>
Et voilà, you have touch support.
Post-processes
If you want, you can use post-processes, read the doc about them. In my demo shown on top of this tut, I just used a glowLayer, writing at the end of my SceneLoader this bits of code:
var glowLayer = new BABYLON.GlowLayer("glowLayer", scene)
Result
I haven't detailled all points in this tutorial, neither go deep into some functions, but you should be able to get this result without difficulty:
see tuto-final.html
Of course, check the sources downloadable at the beginning of the tutorial.
Feel free to use BJS forum thread so as to make feedbacks.
Going further
Here some leads & tricks to tend to ultimate swag:
- add contrast to your lightmaps with an Ambient Occlusion pass
- tweak some post-processes, but pay attention: your 3D scene must be pretty even with post-processes disabled
- learn javascript: when we talk about webGL, the more you know javascript, the more it's easy to work in
- learn Phyton, so as to be able to automate tasks in Blender
Credits
Softwares
Softwares and their addOns I used are:
-
Blender 2.79b, with these addons:
- BabylonJS exporter 5.6.3
- default Blender baking workflow isn't convenient, so I bought Baketool, which I used here. Note that some free addOns could be useful (haven't test all of them, suggest me some if you want): TexTools, BRM-BakeUI, Principled-Baker.
- Materials Utils Specials (by default)
- Layer Management (by default)
-
BabylonJS 3.3.0
-
Gimp 2.10. I prefer Photoshop but I don't have a personnal licence, so why not trying Gimp for this tutorial :).Krita is great too.
-
EasyPhp Devserver 17.0 for local web server
-
Some code editors:
-
to write this tutorial:
- Typora, lite markdown editor
- ScreenToGif, screen capture and gif editor
- Greenshot, screen capture quick and easy
- XnView, image files viewer
- OBS Studio, screen video capture
- Moukey, mouse-keyboard OSD (if you know a better one?)
Resources
Changelog
- 2018-10-13:
- some typo and a bit of grammar
- 2018-10-10:
- first version of this translation
