
(softwares used: Blender 2.79b, BabylonJS 3.3.0)
( version française disponible)
This article will use the excuse of a tiny scene to explain a simple workflow from Blender to BabylonJS, using lightmaps so as to tend to realistic lighting.

(click to launch)
direct link to demo
Non-Blender guys should be still interested by this tutorial, as modeling, unwrapping and organisation guidelines keeps the same in any modeler, and of course the BabylonJS (aka BJS) side is totally independant of the modeler used.
You will probably notice that english isn't my native language, do not hesitate to correct me :)
We're talking about webGL, so for artists used to well-known engine like Unreal Engine or Unity3D I might as well warn you now, some workflow details could chill you:
- 3D engine editing and tweaking tools are less accessible and user-friendly
- handle lighting through lightmaps file: old-school style, artist have to deal with more steps
- code! yes, we have to produce some javascript, in addition to a few bits of html/css (making a webGL app is the same as making a website after all)
Project sources are available here. You will find inside:
- a 3D folder, holding blend files and raw textures
- a BJS folder, holding BabylonJS workspace and the tutorial examples
I will not dwell on modeling and texturing methodologies, which are the same no matter which engine you're using. I assume you already have these kinds of habits (non-exhaustive list):
- units in meters
- realtime modeling technique, obviously
- power of 2 textures sizes
- meticulous assets naming
You should of course took a look on BabylonJS Babylon 101 and How to... pages.
In this example I'm not using PBR workflow but Standard one. This come from the fact that the official Blender-to-BabylonJS exporter doesn't yet handle PBR material exporting. Plus knowing how to work with Standard workflow still could be useful if we target no-so-high-end user hardware (not everybody have the lastest smartphone).
Note that you can export as PBR using glTF format, this workflow is still experimental but usable, this may be a subject for a next tutorial.
As there isn''t raytracing engine inside BabylonJS, my lighting as to be made using a precomputed engine, like Cycles. This forces me to use two scene versions:
- the 3D realtime scene, which is the main production scene and from where the BJS scene is exported, with standards Blender Render materials
- the 3D precomputed scene, dedicated to lightmaps rendering, with Cycles materials and lights
BabylonJS devs give us an editor, but for now it have some limitations for a daily use, specificaly the fact that I can't export and reexport my .babylon/.gltf scene file without loosing my editor tweakings. It can be useful on small one-shot scenes, but in production mode you always have to tweak your scene between your modeler and your engine. But keep an eye on this editor, it's often updated.
I will tweaking as most as I can on Blender scene directly, and once on BJS I will use the Inspector tool to refine things, and save this tweaks... in javascript.
For this tutorial I will not going deeper in optimisation techniques, that's not the point so only minimum will be done. On a complex scene, don't forget every tiny bits of optimisation could be important (non-exhaustive list):
- meshes density (and so size) of objects
- textures size (can be reduced at the end of the project)
- number of dynamic lights
- thick unwrapping for lightmaps
- objects merging & materials sharing
We work on a realtime project, so keep attention to naming to later make easier the code manipulation.
Objects are put in layers to make our life better.
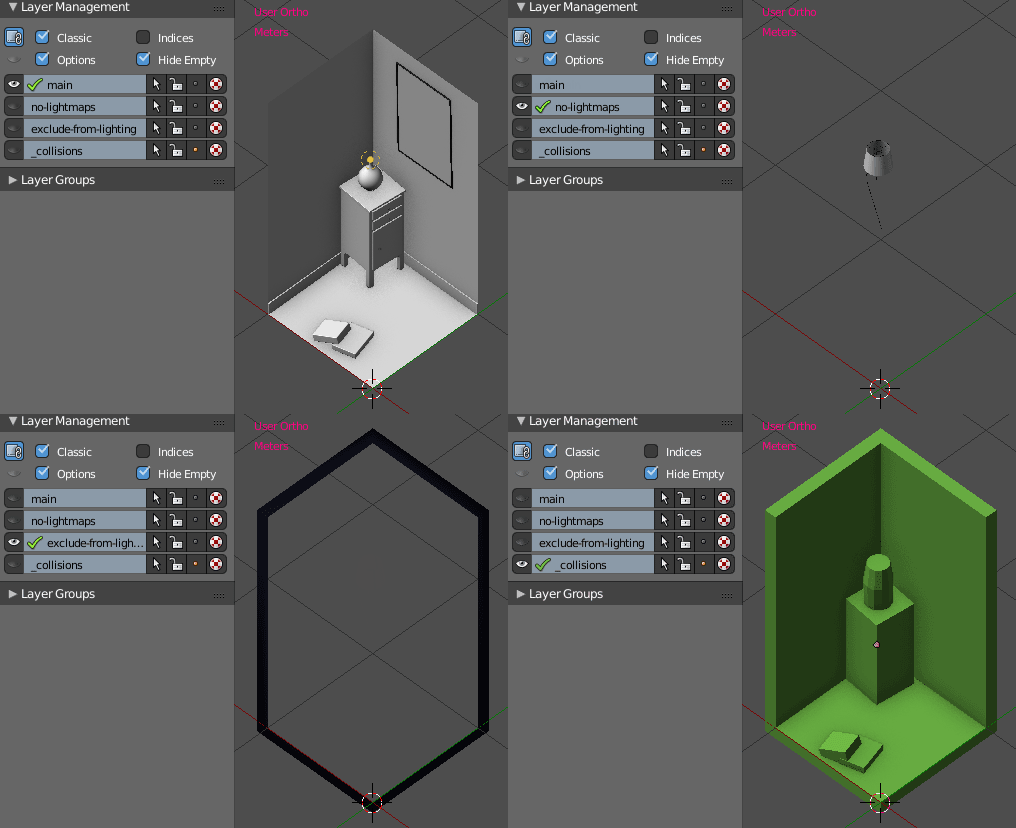
Nothing unusual here. Try to setup your seams and sharp edges when a mesh is done, to avoid have to come back on it later.
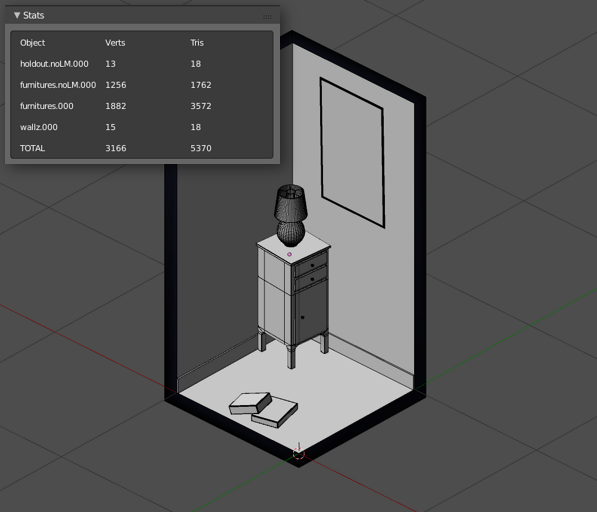
We have obviously unxrapped our commons UVs, but also the one dedicated to lightmaps:

UVMap for texture tiling, UV2 for not-yet-existing lightmaps
Do not waste time on UV2 for now, we just have to check if the automatic unwrapping behave good (Unwrap or SmartUnwrap). UV1 can be definitive.
Objects will be merged together, depending of how we want lightmaps to be used (this depends of each project), but we have to think about some points:
- if some objects use the same materials, we want them merged when possible
- if some objects doesn't need lightmaps, or even can be annoying when render time comes, they can be merged and named with an appropriate keyword to spot them once on the 3D engine
- note that you can be absolutely rigourous about lightmaps surface distribution, we can do maths to know how much texels we want - but on this tiny scene, following your feeling is enough
We have also the option to keep objects detached and to share UV2, but this make both Blender & BabylonJS workflow complicated.
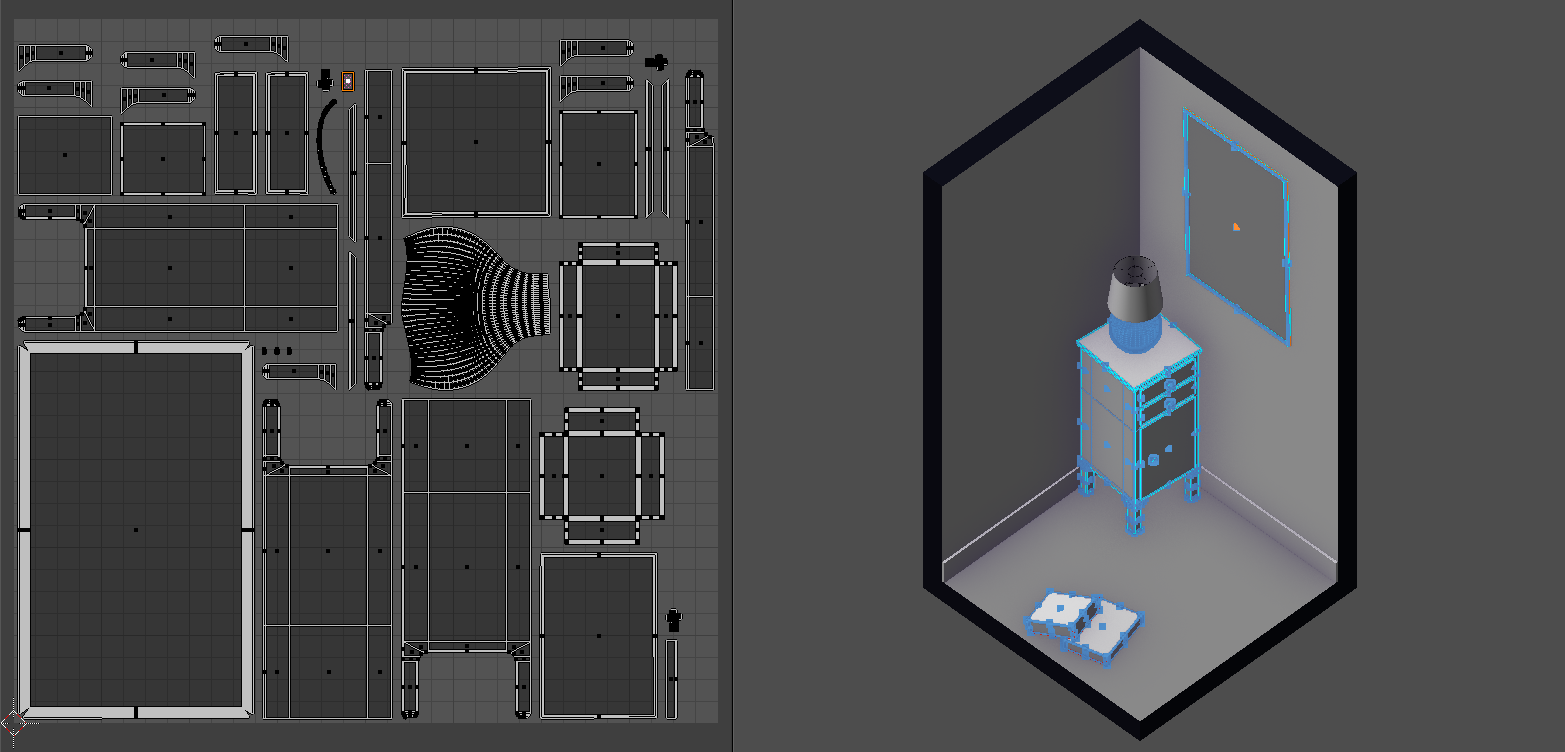
- note the selected face on the UV layout: it's the backside of the poster, scaled to 0.05 because there is no need to use many lightmap pixels here
- we can notice some empties spaces: Blender plugins surely can help us to unwrap in a more efficient way
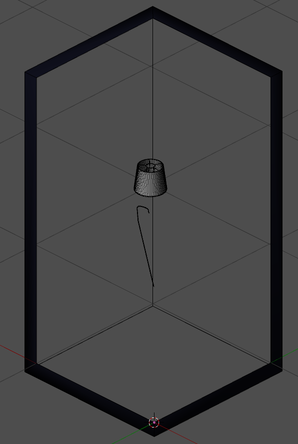
objects excluded from lightmaps, using the keyword noLM (for no LightMap): holdout.noLM.000 and furnitures.noLM.000
At this stage it's already possible to make a first export to BabylonJS, even if our lightmaps still doesn't exists. You can read official doc' about exporter (I wrote some piece of words in it, do not hesitate expressing feedbacks on it).
If you don't already have BabylonJS scene prefab' on hand, don't forget the existence of the editor, or also the sandbox, which allow you to see your 3D in all angles in no time.
Export process isn't really complicated. As you've seen in the official doc', adjustments are in properties panel (for mesh, world, materials, etc).

This way we'll get an ugly rendering, but this can be useful to:
- spot potentials bugs and correct them before starting juggling between scenes
- start some tuning, but very basic because we're still have to set up our scene mood (and our lightmaps)
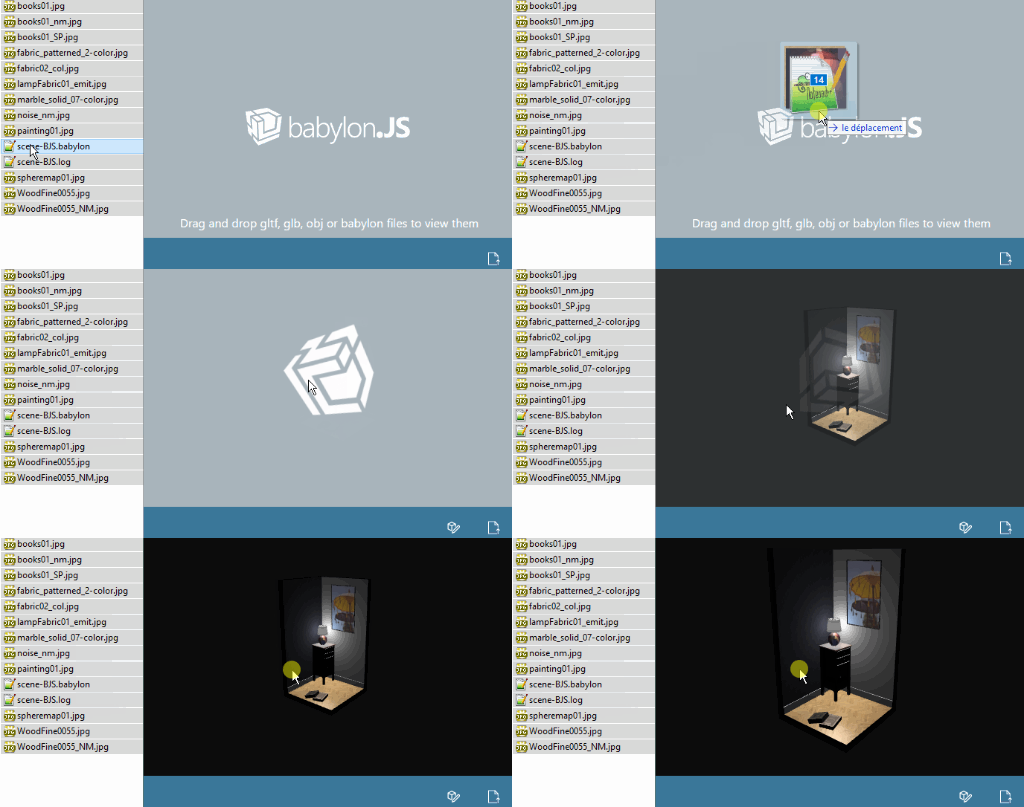
raw export from Blender to BabylonJS Sandbox
When our realtime scene is ready, it's time to see the light. The focus here will be on lighting and not on materials. Actually, we're going to overwrite most of our materials with a very basic and simple one.
First step in our new empty Cycles scene is obviously to append our objects in it.
Few options are available, depending of your preferences:
- Ctrlc then Ctrlv, quick and efficient
File > Append, which may be interestingFile > Link which may be the perfect way, but I still doesn't get the ideal trick to use it
- for curious, the strongest lead to follow should be to link Cycles materials using object level instead of its data (or vice-versa), but my Baketool plugin doesn't seem to like it
In case you're updating the Cycles scene, you already have old objects versions. Before importing new ones, delete the oldest and don't forget to purge Orphan Data through the Outliner.
Once again, layer organisation have its importance, with some roles assigned:
- lightmapped objects, which could be updated from time to time
- objects used for rendering, but not receiving lightmaps (lampshade for example)
- lights and cameras
Since for baking we only need light impact, we don't have to convert all our Blender Render materials to Cycles ones. On a tiny scene like this one, it's still conceivable but on a huge scene containing hundreds of materials there's enough to pull your hairs out - especially if you have to update your geometry three days later.
That's why we're going to create a default Cycles material, simple, named for example _cycles_default_:
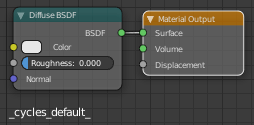
To avoid loose it during an Orphan Data cleaning, we set it as Fake User.
Then we can overwrite and assign it on all our objects, thanks to the Material Specials (default) addon: ShiftQ > Assign Material > _cycles_default_
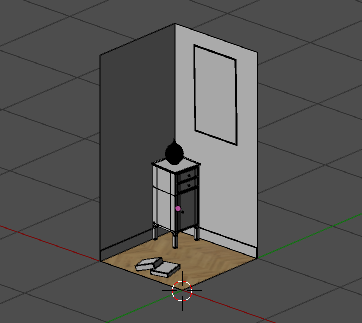
Yep, but what about the color bleeding? Indeed, we lose it completely with this technique. So we can target strategic elements and apply to them specific materials. In this example scene, I've choose the wooden floor ; but this material is still very simple, consisting of the diffuse texture simply linked to the Diffuse BSDF shader.
You may appreciate a short video of the process:
direct link to video
World output coudn't be easier to make, but it's enough for this scene:

Light isn't arduous:

However, by placing the light in its logical place (in the middle of the light bulb), an issue comes: light doesn't travel through bulb and lampshade.
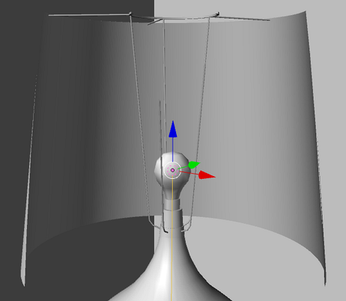
For the bulb, problem is quickly solved, we just have to use a Transparent shader. For the lampshade, we just want transparency too but with a color similar to the lampshade fabric color we want:
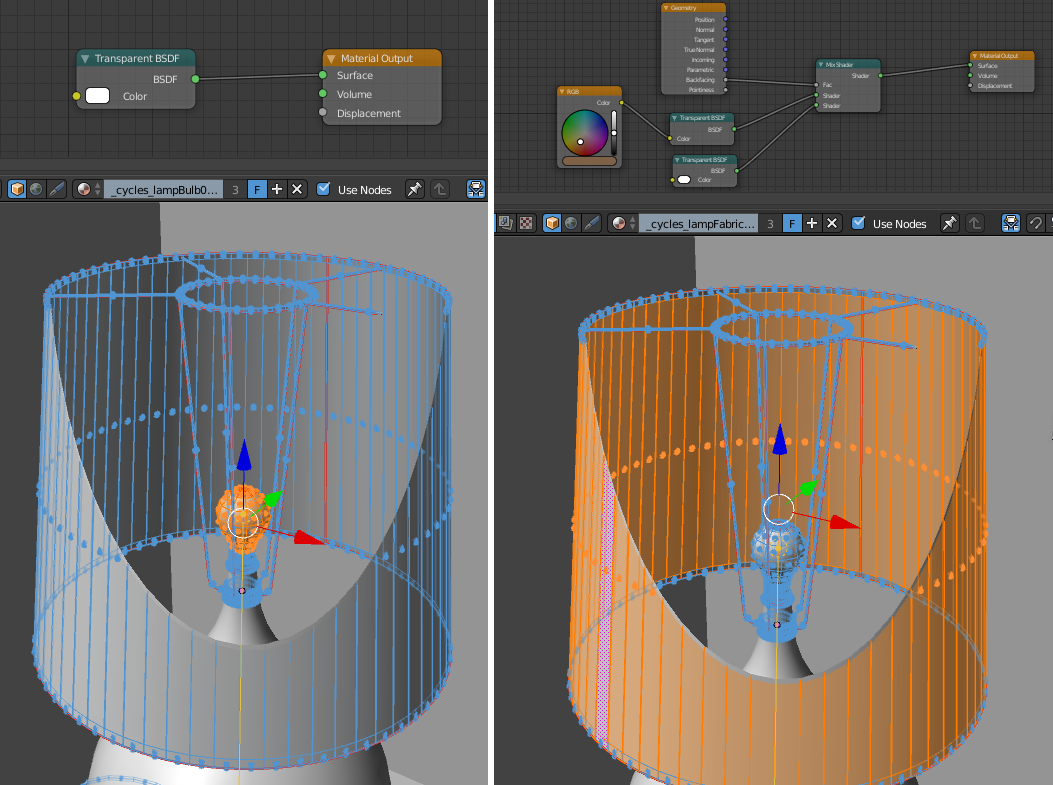
Note that Fake User is checked on these materials, allowing to not loose them during meshes updating
To reduce render noise, check official Blender doc'
We now have a nice lighting, time to go to the lightmaps baking step!

I use the Baketool addon, easy to use. You will find some other addOns at the end of this page. If you need default Blender baking workflow, check the official doc'.
Get your objects list and bake on the second UV channel.
The main point here is to bake the Diffuse pass without the Color option. Indeed, we just need direct and indirect lighting, nothing more.
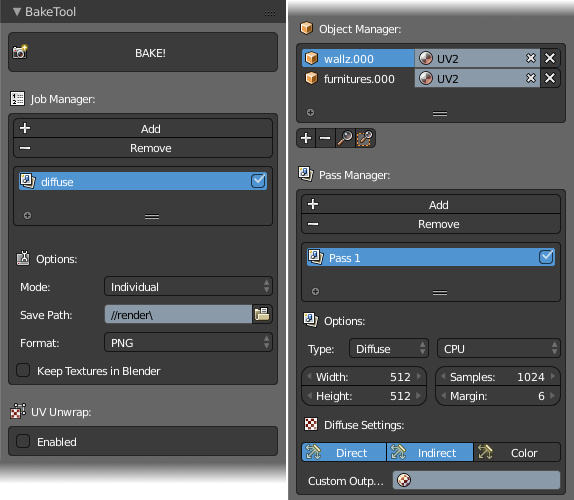
Baketool setup
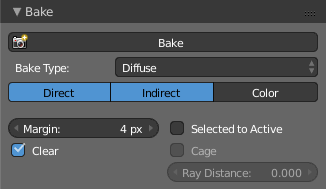
FYI, default Blender baking setup
Render!
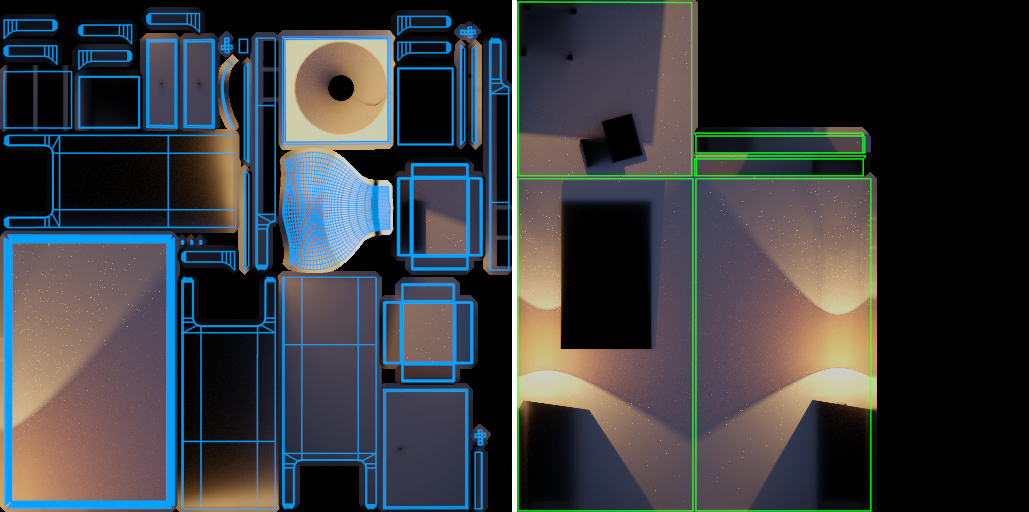
look at this wonderful empty lost space on the wall lightmap, boo me
We can accept few noise on our lightmaps (as baking take much more time than a regular render), and then apply a denoise pass:
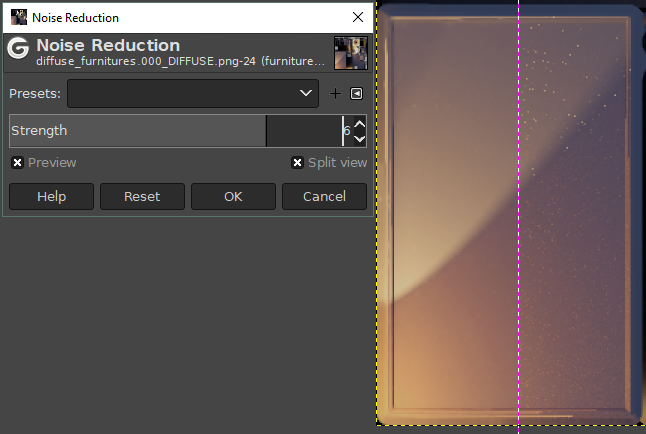
denoise on Gimp
Save your lightmaps files on BJS/assets/lightmaps/ folder.
As seen above, you may don't bother yourself with code, by using the official editor. Just be sure to not have to reexport and so reimport your scene file.
Note that you need a web server. You will find some tips here.
But this tutorial will start from scratch. Nevertheless, if you're not comfortable with coding, copy-paste way is often possible. Note that I'm not a developper so my code is probably not optimal.
Prefer using your browser in private mode to avoid cache issues, and always show the console (you can even setup your console to always disable cache when opened).
To avoid mess in our app root folder, we need a file tree:
| File tree |
Function |
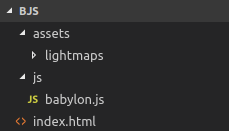 |
- BJS: root folder of our webGL project
- assets: this is where we export our .babylon file
- lightmaps: lightmaps go here
- js: javascripts files
- index.html: main file where our code will be
|
You can already export the babylon file in the assets folder, textures will be copied automatically. Put your lightmaps files in their folder.
Rather than use the online version of BabylonJS file, it's often better to use a local version (downloaded in js folder). For this tutorial we will write our javascript in our main html file, but it should be cleaner to use the js folder too.
index.html is the place where everything will happens. Start to create an empty file named as index.html, then edit it.
Always with the help of the official BJS doc', we're quick going to our first scene loading:
<!doctype html>
<html>
<head>
    <title>From Blender to Babylon - standard workflow</title>
    <meta charset="UTF-8">
    <script src="https://www.nothing-is-3d.com/js/babylon.js"></script>
    <style>
        html, body {
            overflow: hidden;
            width: 100%;
            height: 100%;
            margin: 0;
            padding: 0;
            font-family: tahoma, arial, sans-serif;
            color:white;
        }

        #canvas {
            width: 100%;
            height: 100%;
            touch-action: none;
        }
    </style>
</head>
<body>
    <canvas id="canvas"></canvas>
    <script type="text/javascript">
        var canvas = document.getElementById("canvas");
        var engine = new BABYLON.Engine(canvas, true);
        var scene = new BABYLON.Scene(engine);
        // ArcRotateCamera doc, you can use FreeCamera if you prefer:
        // http://doc.babylonjs.com/api/classes/babylon.arcrotatecamera#constructor
        var arcRotCam = new BABYLON.ArcRotateCamera(
            "arcRotateCamera", 1, 1, 4,
            new BABYLON.Vector3(0, 1, 0),
            scene
        );
        arcRotCam.attachControl(canvas, true);

        // SceneLoader doc :
        // http://doc.babylonjs.com/api/classes/babylon.sceneloader#append
        BABYLON.SceneLoader.Append(
            "assets/",
            "scene-BJS.babylon",
            scene
        );

        engine.runRenderLoop(function () {
            scene.render();
        });

        window.addEventListener("resize", function () {
            engine.resize();
        });
    </script>
</body>
</html>
In the <head> tag, nothing unusual: we tell where is the BabylonJS engine file, and we tell the browser that we want our 3D part (canvas) takes all the whole page.
In the <body> tag our interest is on the function BABYLON.SceneLoader.Append which allows us to load our 3D. But before that, we had:
- instanciated the 3D engine
var engine = new BABYLON.Engine(canvas, true);
- created a scene using this engine
var scene = new BABYLON.Scene(engine);
- created a camera
Camera position values I've put here have to be tweaked. After looking in the doc', I make sure that:
- my spawn camera position is alright:
var arcRotCam = new BABYLON.ArcRotateCamera("arcRotateCamera", 5.5, 1.2, 3.75, new BABYLON.Vector3(-0.8, 0.75, 0.8), scene);
- my mousewheel actions are smoother:
arcRotCam.wheelPrecision = 200;
- my min camera clipping is tuned according to my scene scale:
arcRotCam.minZ = 0.005; ( = 5 mm)
Here our first scene loading!
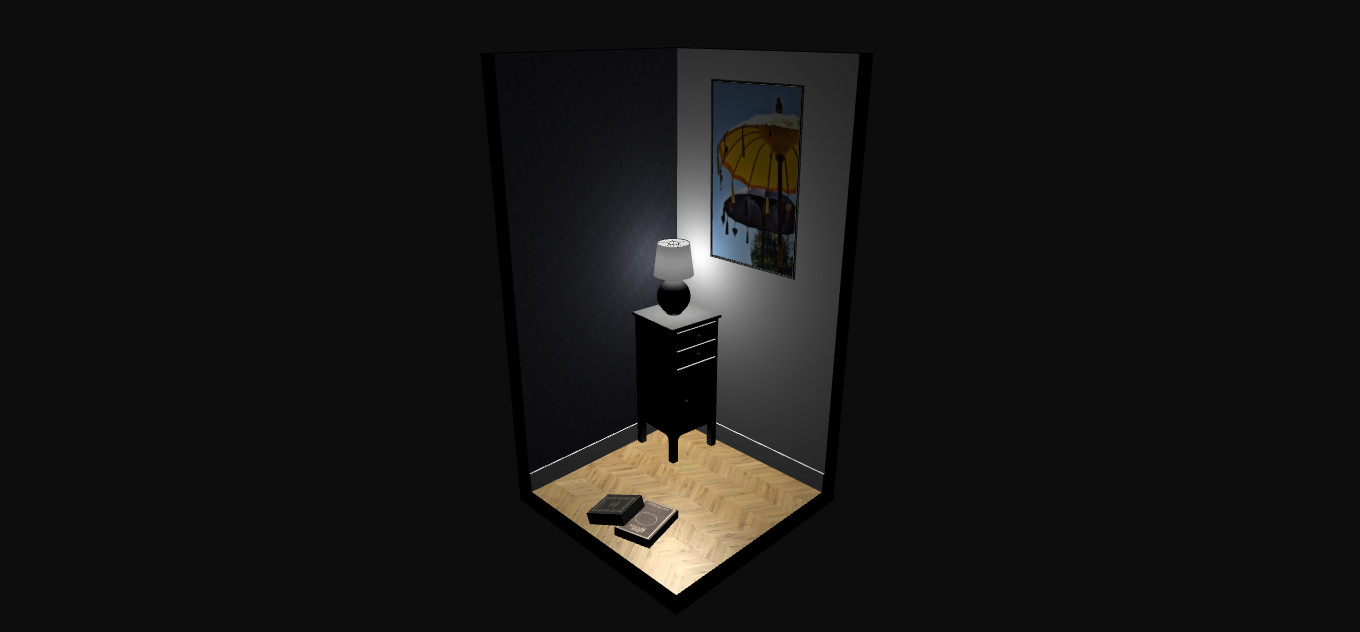
see tuto01.html
Before taking care of materials, we still have to handle lightmaps and assign them automatically to our objects.
We're going to increase the difficulty a notch, because we'll need to:
- loop among our objects and exclude ones which doesn't get lightmaps
- loading lightmap files
- assign these lightmaps on the rights materials
- do basic material tweaking to ensure nice lightmap use
To be sure our objects exists when we call them, we need to be on the onSuccess of our SceneLoader. Below an example showing file loaded!when the .babylon is loaded:
BABYLON.SceneLoader.Append(
    "assets/",
    "scene-BJS.babylon",
    scene,
    function(){
        console.log("file loaded!")
    }
);
see tuto02.html (check the console)
So our bits of code will be on this function. But before the SceneLoader, I need a function dedicated to material lightmap assignation, named here assignLightmapOnMaterial:
function assignLightmapOnMaterial(material, lightmap) {
    material.lightmapTexture = lightmap;
    // we want using UV2
    material.lightmapTexture.coordinatesIndex = 1;
    // our lightmap workflow is a darken one
    material.useLightmapAsShadowmap = true;
}

BABYLON.SceneLoader.Append(
    "assets/",
    "scene-BJS.babylon",
    scene,
    function () {
        /** LIGHTMAP ASSIGNATION PROCESS **/
        // lightmapped meshes list
        var lightmappedMeshes = ["wallz.000", "furnitures.000"];
        // we start cycling through them
        for (var i = 0; i < lightmappedMeshes.length; i++) {
            var currentMesh = scene.getMeshByName(lightmappedMeshes[i]);
            // lightmap loading
            var currentMeshLightmap = new BABYLON.Texture(
                "assets/lightmaps/" + currentMesh.name + "_LM.jpg",
                scene
            );
            currentMeshLightmap.name = currentMesh.name + "_LM";
            // we start cycling through each mesh material(s)
            if (!currentMesh.material) {
                // no material so skipping
                continue;
            } else if (!currentMesh.material.subMaterials) {
                // no subMaterials
                assignLightmapOnMaterial(
                    currentMesh.material,
                    currentMeshLightmap
                );
            } else if (currentMesh.material.subMaterials) {
                // we cycle through subMaterials
                for (var j = 0; j < currentMesh.material.subMaterials.length; j++) {
                    assignLightmapOnMaterial(
                        currentMesh.material.subMaterials[j],
                        currentMeshLightmap
                    );
                }
            }
        }
        /** END OF LIGHTMAP ASSIGNATION PROCESS **/
    }
);
If you just want doing copy-paste without analysis, check only this part: var lightmappedMeshes = ["wallz.000", "furnitures.000"]; where you have to customize your lightmapped objects name.
Of course in a huge scene using tons of objects you can't manually set a list like that, but for this tutorial, automate this process would have been overcomplicated.
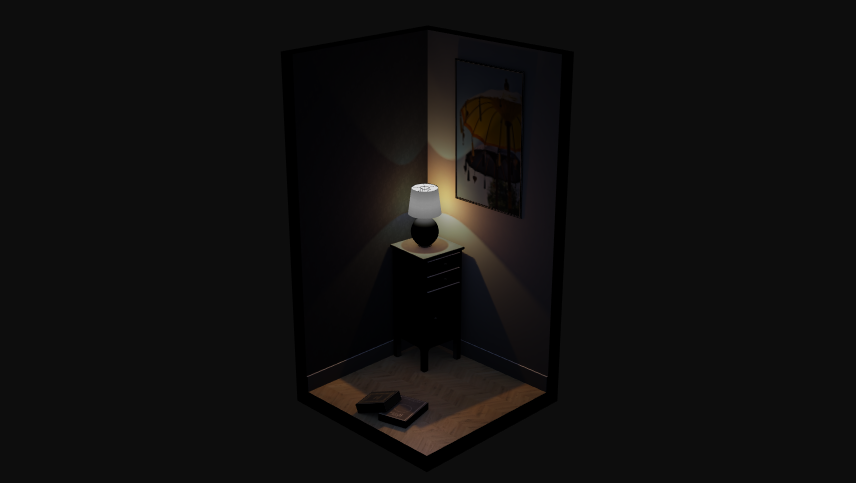
see tuto03.html
We quickly see something is wrong in our render. When we have setup the useLightmapAsShadowmap property in our lightmapped materials, we tell engine to multiply scene ambientColor with materials ambientColor. So if the scene ambient is gray, even if a material ambient is white, this will make it gray (clamped by scene ambient).
Consequently we set this scene ambient to white in our sceneLoader:
scene.ambientColor = BABYLON.Color3.White();
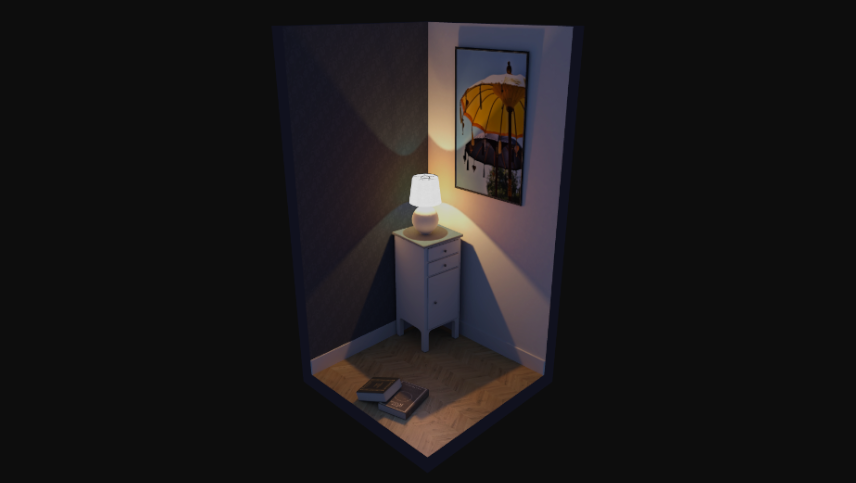
see tuto04.html
You may have already set a pointLight inside Blender (do it, if not). This one is exported and already influence your materials, on diffuse & specular:
| Blender |
BabylonJS |
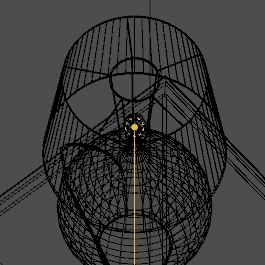 |
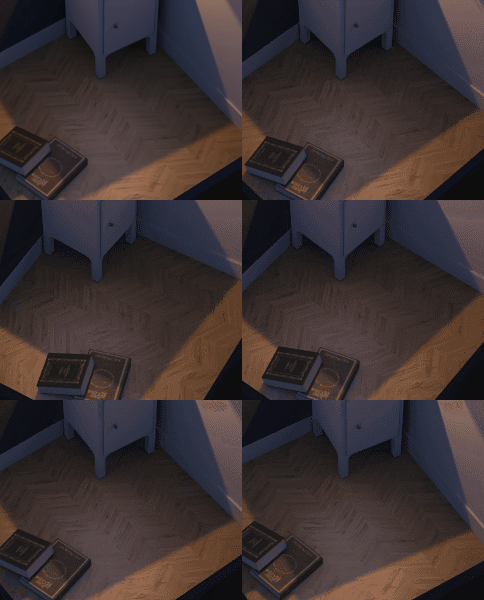 |
Same as for materials, the more you set in Blender, the easiest it is. For more advanced tuning, you should understand how to do that once tut'materials part will be done.
To know all existing properties names, as usual... check the doc'. Don't forget settings which are already reachable through Blender.
So then, how to access to materials via javascript? First we're going to launch the Inspector tool, which will show us an UI with many scene properties.
We have to call this tool at the end of our sceneLoader function:
[...]

        }
        /** END OF LIGHTMAP ASSIGNATION PROCESS **/

        /* tools */
        scene.debugLayer.show();
    }
);

[...]
let's say we want our white wall turned to pink. We just have to go on the Material tab, find our material (use the Filter by name...), find our ambientColor property and tweak it.
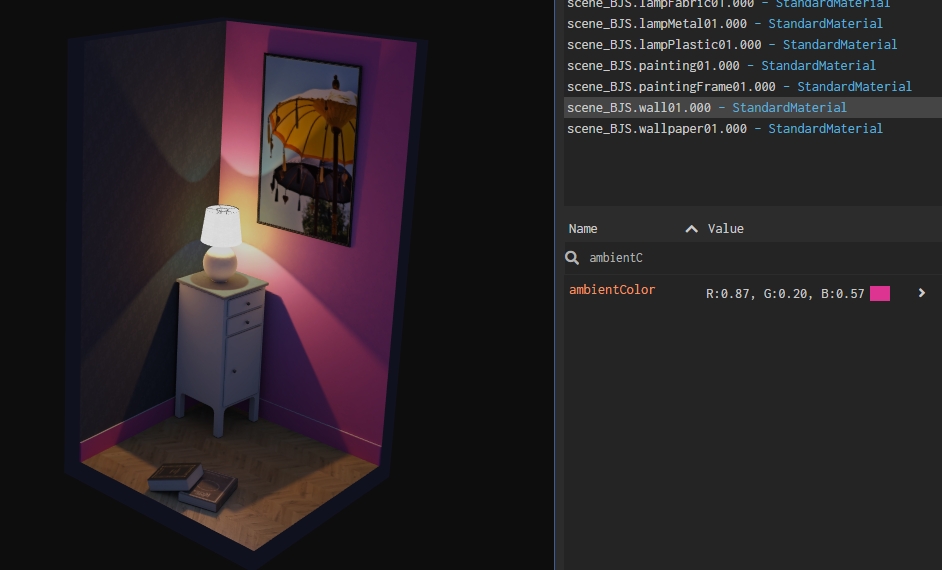
Then your reload your page to check if it's saved... and here the drama: of course, our tweak is lost.
So it's time to create a javascript variable containing our material, and assign it our tweak:
[...]

        }
        /** END OF LIGHTMAP ASSIGNATION PROCESS **/

        var wall01Mtl = scene.getMaterialByName("scene_BJS.wall01.000");
        wall01Mtl.ambientColor = new BABYLON.Color3(0.87, 0.2, 0.57);

        /* tools */
        scene.debugLayer.show();
    }
);

[...]
Hop! We're good.
see tuto05.html
You're going to tell me "Hmm ok, but ambientColor could be set up without any difficulty inside Blender, isn't it?", and you'll be right, this example was just an easy-to-see one for this tut.
The process is exactly the same for any property, here I just checked the API about ambientColor and I can see BJS ask for a Color3, duly noted.
Let's imagine that I want to delete a lightmap on a specific material, and not on all the object?
scene.getMaterialByName("scene_BJS.wall01.000").lightmapTexture = null;
here I even don't created a variable, it's probably a bad practice
My normalMaps have been created for DirectX and not OpenGL?
for (var k = 0; k < scene.materials.length; k++) {
    scene.materials[k].invertNormalMapY = true;
}
here we loop inside all scene materials
Before ending this tutorial, a tiny trick to simulate reflections without loosing FPS: using a spheremap. This is an old-school technique which could give us cheap rendering if too strong, but on curved surfaces (like ceramic of our lamp) can do its job. Just take a screenshot of your BJS scene and apply it a spherical filter:
spherical filter from Gimp
Then inside Blender, assign this texture to your material and set the Mapping to Spherical.
Touch support
To be sure touch devices could be targeted, we have to use a javascript library named PEP.
Download the minified version here, put it on the BJS/js/ folder and called it in the <head> tag.
You also have to write touch-action="none" in the <canvas>tag.
<!doctype html>

<html>

<head>

    [...]

    <script src="https://www.nothing-is-3d.com/js/babylon.js"></script>
    <script src="https://www.nothing-is-3d.com/js/pep.min.js"></script>

    [...]

</head>
<body>
    <canvas id="canvas" touch-action="none"></canvas>
Et voilà, you have touch support.
Post-processes
If you want, you can use post-processes, read the doc about them. In my demo shown on top of this tut, I just used a glowLayer, writing at the end of my SceneLoader this bits of code:
var glowLayer = new BABYLON.GlowLayer("glowLayer", scene)
I haven't detailled all points in this tutorial, neither go deep into some functions, but you should be able to get this result without difficulty:
see tuto-final.html
Of course, check the sources downloadable at the beginning of the tutorial.
Feel free to use BJS forum thread so as to make feedbacks.
This tutorial took me several hours of work, if you want to buy me a beer 🍻, it's this way ;)
Here some leads & tricks to tend to ultimate swag:
- add contrast to your lightmaps with an Ambient Occlusion pass
- tweak some post-processes, but pay attention: your 3D scene must be pretty even with post-processes disabled
- learn javascript: when we talk about webGL, the more you know javascript, the more it's easy to work in
- learn Phyton, so as to be able to automate tasks in Blender
Softwares
Softwares and their addOns I used are:
-
Blender 2.79b, with these addons:
- BabylonJS exporter 5.6.3
- default Blender baking workflow isn't convenient, so I bought Baketool, which I used here. Note that some free addOns could be useful (haven't test all of them, suggest me some if you want): TexTools, BRM-BakeUI, Principled-Baker.
- Materials Utils Specials (by default)
- Layer Management (by default)
-
BabylonJS 3.3.0
-
Gimp 2.10. I prefer Photoshop but I don't have a personnal licence, so why not trying Gimp for this tutorial :).Krita is great too.
-
EasyPhp Devserver 17.0 for local web server
-
Some code editors:
-
to write this tutorial:
Resources
- 2018-10-13:
- some typo and a bit of grammar
- 2018-10-10:
- first version of this translation

(logiciels utilisés : Blender 2.79b, BabylonJS 3.3.0)
( english version available)
Cet article va prendre le prétexte d'une toute petite scène pour présenter un workflow simple de Blender vers BabylonJS, comprenant la gestion des lightmaps, afin de tendre vers un éclairage réaliste.

(cliquez pour lancer)
lien direct vers la démo
Les non-utilisateurs de Blender resteront peut-être intéressés par ce tutorial, puisque les grandes lignes de modélisation, unwrapping et gestion de la scène et ses objets restent les mêmes peu importe le logiciel, et aussi bien entendu la partie BabylonJS (BJS de son petit nom) qui est totalement indépendante du modeler utilisé.
Nous allons toucher des mains le webGL, donc pour les infographistes habitués des moteurs en vogue comme Unreal Engine ou Unity3D, autant vous prévenir maintenant, voici les gros points qui vont vous faire mal :
- les outils d'éditions et de réglages côté moteur 3D : beaucoup moins accessibles et ergonomiques
- la gestion de l'éclairage par les lightmaps : à l'ancienne, toute la chaine est à gérer par le graphiste
- le code ! Et oui, il va falloir pondre du javascript, en plus de quelques bouts de html/css (faire une appli webGL c'est faire un site web après tout)
Les sources du projet sont disponibles ici. Vous y trouverez :
- le dossier 3D, contenant les fichiers blend et les textures originales
- le dossier BJS, contenant l'espace de travail BabylonJS et les exemples du tutoriel
Je ne m'attarderais pas ici sur les méthodes de modélisation et de texturing, qui conservent les mêmes logiques peu importe le moteur qu'on utilise. Je pars du postulat que vous avez déjà ces notions de base (liste non-exhaustive) :
- unité de base au mètre
- modélisation orientée... temps réel évidemment
- textures en puissance de 2
- nommage correct et rigoureux de tous les assets
Il est bien sur conseillé d'avoir regardé et testé les Babylon 101 et les How to... de BabylonJS.
Pour cet exemple je ne suis pas en workflow PBR mais Standard. Ceci vient du fait que l'exporteur officiel Blender-vers-BJS ne gère pas encore la conversion en PBR des matériaux. Il est aussi encore utile de savoir se débrouiller avec le Standard Workflow si l'on vise des machines utilisateurs peu puissantes (tout le monde n'a pas le dernier smartphone à la mode).
Il est cependant possible de travailler en PBR en exportant au format glTF, ce workflow est encore en phase expérimentale et soumis à quelques bugs, mais il fera l'objet d'une suite à ce tuto.
Puisqu'il n'y a pas de moteur de rendu raytracing dans BabylonJS, je vais devoir faire mon éclairage sous un moteur précalc', comme Cycles. Cela m'oblige à créer deux versions de ma scène :
- la scène 3D temps réel, qui est en fait le fichier de travail principal et d'où la scène BJS est exportée, avec les matériaux standards Blender Render
- la scène 3D précalculée, qui va être dédiée à la création de lightmaps, avec les matériaux et les lights Cycles
Les développeurs de BabylonJS nous proposent un éditeur, mais il possède des limitations qui ne me conviennent pas au quotidien, en particuler le fait que si je fais un nouvel export de ma scène Blender, il me faut recommencer tous mes réglages côté éditeur. Pourquoi pas lorsqu'il s'agit de jouer sur une micro-scène en one-shot, mais en production classique avec des exports & réexports permanents, ça n'est pas utilisable en l'état. Éditeur à surveiller tout de même, puisque souvent mis à jour.
J'effectuerais donc le plus de réglages possibles dans la scène Blender directement, puis une fois dans BJS j'utiliserais l'outil Inspector pour peaufiner tout ça, et reporterais les données... en javascript.
Pour ce tutoriel je n'irais pas très loin dans les différents techniques d'optimisation, puisque ce n'est pas le sujet, je ferais donc le minimum nécessaire. Sur un scène complexe, la moindre optimisation peut avoir son importance (liste non-exhaustive) :
- maillage (et donc poids) des meshes
- taille des textures (peuvent se réduire en fin de projet)
- nombre de lampes dynamiques
- dépliage serré - avec parcimonie - des UV lightmaps
- jonction des objets & partage des matériaux
On est en temps réel, donc évidemment les objets doivent avoir un nom explicite, tachez de faire attention à ça, c'est important pour la suite lorsqu'on s'amusera avec du code.
Les objets sont séparés en calques pour rendre plus fluide nos opérations.

Rien d'exceptionnel ici. Pensez juste à préparer vos seams et sharp edges quand un mesh est terminé, pas besoin de s'y replonger après coup.

On devra évidemment enchainer non seulement sur le dépliage des UV classiques, mais aussi ceux dédiés aux lightmaps :

UVMap pour le texture tiling, UV2 pour les futures lightmaps
Ne pas perdre du temps à soigner les UV2 pour le moment, il s'agit juste de vérifier que le dépliage automatique se comporte bien (Unwrapping ou SmartUnwrap). Les UV1 peuvent être définitifs.
Les objets vont être attachés ensemble selon la distribution désirée des lightmaps (là ça dépend vraiment de chaque projet), mais il va falloir réfléchir à plusieurs choses :
- si des objets partagent les mêmes matériaux, on tentera évidemment de les réunir
- certains objets n'auront pas besoin de lightmaps, et seront même gênants lors du rendu Cycles, on pourra donc les attacher ensemble, et veiller à utiliser un mot-clef permettant de les repérer par code une fois dans le moteur 3D
- notez que si l'on souhaite être absolument rigoureux sur la répartition de surface des lightmaps, on peut s'embêter à calculer les texels afin de conserver une harmonie entre tous les différents objets et la résolution de leur lightmap, mais pour cette scène je me le fais au feeling.
Il serait aussi possible de laisser détachés les objets et donc d'avoir des UV2 partagés, mais le workflow se compliquerait aussi bien du côté Blender que du côté Babylon.

- dans la planche UV, notez la face selectionnée : il s'agit de la surface arrière du tableau, scalée à 0.05 puisqu'il est inutile qu'elle utilise de la place sur la future ligthmap
- on peut remarquer qu'il reste un peu de vide : des plugins Blender aideraient à mieux répartir tout ça, mais dans une contrainte de rapidité de prod' en milieu pro', il n'est pas toujours évident d'atteindre la perfection. Ici le déplié reste satisfaisant.

mes deux objets exclus des lightmaps, utilisant le mot-clef noLM (pour no LightMap) : holdout.noLM.000 et furnitures.noLM.000
À ce stade, il est déjà possible de faire un premier export vers BabylonJS, même si nos lightmaps n'existent toujours pas. Vous pouvez déjà lire la doc' officielle à propos de l'exporteur (j'en ai écrit une partie, n'hésitez pas à me faire des retours et suggestions).
Si vous n'avez encore de setups BabylonJS sous la main, n'oubliez pas l'existence de l'éditeur, ou même de la sandbox, qui vous permettront de regarder votre 3D sous tous les angles en deux temps, trois mouvements.
L'export en lui-même n'est vraiment pas compliqué. Comme vous l'avez vu dans la doc' officielle, les réglages se situent dans les propriétés des meshes directement (ou du world, ou du material, etc).

Nous aurons alors un rendu moche, mais qui servira :
- à repérer d'éventuels bugs et à les corriger avant de commencer à jongler entre les scènes.
- à commencer du réglage, mais forcément très basique et succin puisque l'ambiance sera modifiée lors de l'ajout des lightmaps

export brut de Blender vers la Babylon Sandbox
Lorsque notre scène temps réel est prête, il est temps de s'occuper de notre ambiance lumineuse. Il va être question ici de se concentrer sur l'éclairage et non sur le peaufinage des matériaux. En fait, nous allons même écraser la plupart des matériaux en les remplaçant par un seul tout simple et tout basique.
La première action à affectuer dans notre nouvelle scène Cycles vide est évidemment d'importer nos objets dedans.
Plusieurs type d'actions existent, dépendant de vos préférences :
- Ctrlc puis Ctrlv, rapide et efficace
- le
File > Append, qui peut être intéressant
- le
File > Link qui serait le workflow parfait, mais je n'ai pas encore trouvé l'astuce idéale pour ça
- pour les curieux, la piste la plus solide serait de lier les matériaux Cycles au niveau de l'objet plutôt que de ses data (ou vice-versa), mais mon plugin BakeTool n'a pas l'air d'apprécier.
Dans le cas où vous mettez à jour la scène Cycles, vous aurez déjà présentes les anciennes version d'objets. Avant d'importer les nouvelles versions, supprimez les anciennes et n'oubliez pas de supprimer les Orphan Data via l'Outliner.
Là encore, j'utilise soigneusement les calques, avec certains roles assignés :
- les objets lightmappés, qui seront potentiellement à mettre à jour de temps en temps
- les objets dédiés au rendu mais ne recevant pas de lightmaps (abat-jour par exemple)
- les lights et les caméras
Puisqu'au baking seul l'impact lumineux nous intéresse, il n'est pas vraiment utile de se coltiner une conversion de tous nos matériaux Blender Render vers Cycles. Sur une petite scène comme ça, cela reste envisageable mais sur une scène avec plus d'une centaine de matériaux y'a de quoi s'arracher les cheveux - surtout s'il nous faut faire une mise à jour de toute la géométrie deux jours plus tard.
C'est pourquoi nous allons créer un matériau Cycles par défault, tout simple, nommé par exemple _cycles_default_ :

Afin d'éviter de le perdre lors d'un éventuel Orphan Data clean, on le met en Fake User.
Ensuite, il est possible - grâce au plugin Material Specials - d'écraser et d'assigner ce matériaux à tous nos objets : ShiftQ > Assign Material > _cycles_default_
Oui mais, et le color bleeding ? En effet on le perd totalement avec cette technique. On peut alors sélectionner les éléments d'importance et créer des matériaux particuliers. Dans ma scène, j'ai choisi de conserver mon parquet ; mais là encore le matériau est tres simple puisqu'il s'agit tout simplement de la diffuse connectée au shader Diffuse BSDF.

Une petite capture vidéo du process sera peut-être bienvenue :

lien direct vers la vidéo
Le world output est on-ne-peut-plu' simple, mais suffisant pour cette scène :

La light est toute simple également :

En revanche, en ayant placé la light à son emplacement logique (à savoir au milieu de l'ampoule), nous nous confrontons à un problème évident : la lumière ne passe pas à travers l'ampoule et l'abat-jour.

Pour l'ampoule le problème est très simple à régler, il suffit de lui assigner un shader entièrement transparent. Pour l'abat-jour, le matériaux n'est finalement pas beaucoup plus complexe, on apporte juste une couleur unie proche du tissu de l'abat-jour :

notez l'activation du mode Fake User sur ces matériaux, afin de ne pas les perdre en cas de mise à jour des meshes
Pour réduire le bruit au rendu , se référer à la doc' Blender officielle.
On a maintenant un éclairage qui ressemble à quelque chose, on va pouvoir passer au baking des lightmaps.

Ici j'utilise Baketool, qui n'est pas très compliqué à prendre en main. Si vous souhaitez utiliser le workflow par défaut, voir la doc' Blender officielle.
Préparez votre liste d'objets et bakez sur leur second canal UV.
Le point important ici est de sélectionner la passe de Diffuse sans sa Color. En effet, nous ne désiront que l'impact lumineux direct et indirect.

configuration du baking avec baketool

pour info, l'option de baking par défaut de Blender
Lancez le calcul.

admirez ce magnifique espace perdu pour la lightmap des murs, huez moi
Il est possible de tolérer un certain niveau de bruit au rendu (puisque le baking prend beaucoup plus de temps de calcul qu'un rendu classique), puis de faire une passe de denoise ensuite :

filtre Denoise sous Gimp
Enregistrez vos lightmaps finales dans votre dossier BJS/assets/lightmaps/.
Comme vu plus haut, il vous est possible de ne pas vous prendre la tête avec du code en utilisant l'éditeur officiel. Soyez juste certain de ne pas avoir à mettre à jour votre fichier exporté.
Notez aussi qu'il vous faut avoir accès à un serveur web. Vous trouverez un peu d'aide sur cette page.
Mais pour ce tuto je vais utiliser la méthode en partant de zéro. Néanmoins même si vous n'êtes pas très à l'aise avec le code, le copier-coller est toujours possible. Notez que je ne suis pas développeur pro', et qu'il est possible que mon code soit à peaufiner (me faire des retours si c'est le cas ;) )
Préférez afficher votre scène en mode navigation privée, pour éviter les problèmes de cache, et sachez qu'avoir la console ouverte est quand même très utile (en allant dans les settings de celle-ci, vous pouvez forcer la non-mise en cache).
Pour éviter de se retrouver avec un tas de fichiers en vrac à la racine de notre future application 3D web, on va organiser une petite arborescence :
| Arborescence |
Fonction |
 |
- BJS : le dossier racine de notre projet webGL
- assets : c'est ici qu'on va exporter notre fichier .babylon
- lightmaps : contient nos lightmaps
- js : les fichiers javascripts
- index.html : notre fichier principal où va se trouver notre code
|
Vous pouvez déjà exporter le fichier babylon dans le dossier assets, les textures nécessaires y seront copiées automatiquement. Placez dans le dossier dédié les lightmaps.
Plutôt que de lier le moteur BabylonJS sur une version en ligne, je pense qu'il est toujours préférable de rapatrier une version en local (placée dans le dossier js). Le reste de notre javascript sera ici écrit directement dans notre fichier html principal, mais il serait plus propre de l'écrire dans un fichier dédié placé dans ce dossier js lui aussi.
L'index.html est l'endroit où tout va se passer. Commencez par créer un fichier texte vide nommé ainsi, puis éditez-le.
Toujours en s'aidant de la doc' BJS officielle, on arrive vite à notre premier chargement de scène 3D :
<!doctype html>
<html>
<head>
    <title>From Blender to Babylon - standard workflow</title>
    <meta charset="UTF-8">
    <script src="https://www.nothing-is-3d.com/js/babylon.js"></script>
    <style>
        html, body {
            overflow: hidden;
            width: 100%;
            height: 100%;
            margin: 0;
            padding: 0;
            font-family: tahoma, arial, sans-serif;
            color:white;
        }

        #canvas {
            width: 100%;
            height: 100%;
            touch-action: none;
        }
    </style>
</head>
<body>
    <canvas id="canvas"></canvas>
    <script type="text/javascript">
        var canvas = document.getElementById("canvas");
        var engine = new BABYLON.Engine(canvas, true);
        var scene = new BABYLON.Scene(engine);
        // ArcRotateCamera doc, you can use FreeCamera if you prefer:
        // http://doc.babylonjs.com/api/classes/babylon.arcrotatecamera#constructor
        var arcRotCam = new BABYLON.ArcRotateCamera(
            "arcRotateCamera", 1, 1, 4,
            new BABYLON.Vector3(0, 1, 0),
            scene
        );
        arcRotCam.attachControl(canvas, true);

        // SceneLoader doc :
        // http://doc.babylonjs.com/api/classes/babylon.sceneloader#append
        BABYLON.SceneLoader.Append(
            "assets/",
            "scene-BJS.babylon",
            scene
        );

        engine.runRenderLoop(function () {
            scene.render();
        });

        window.addEventListener("resize", function () {
            engine.resize();
        });
    </script>
</body>
</html>
Dans les balises <head> rien de particulier : on indique le chemin du moteur, et on informe le navigateur que l'on souhaite que la partie 3D (canvas) remplisse toute notre page.
Dans les balises <body> ce qui nous intéresse particulièrement ici est la fonction BABYLON.SceneLoader.Append qui nous permet d'intégrer notre 3D. Mais on aura auparavant :
- instancié le moteur 3D
var engine = new BABYLON.Engine(canvas, true);)
- créé une scène en utilisant ce moteur
var scene = new BABYLON.Scene(engine);
- créé une caméra
Les valeurs de positions caméra que j'ai renseigné ci-dessus méritent d'être peaufinées. Après avoir regardé du côté de la doc', je me débrouille pour que :
- ma vue initiale soit correcte :
var arcRotCam = new BABYLON.ArcRotateCamera("arcRotateCamera", 5.5, 1.2, 3.75, new BABYLON.Vector3(-0.8, 0.75, 0.8), scene);
- mes coups de molettes dézomment moins violemment :
arcRotCam.wheelPrecision = 200;
- mon clipping min soit adapté à la scène :
arcRotCam.minZ = 0.005; ( = 5 mm)
Nous voici donc avec notre premier chargement de scène !

voir tuto01.html
Avant de s'attaquer aux réglages matériaux, il nous reste à gérer les lightmaps et à les assigner de façon automatique à nos objets.
Ici on va monter d'un cran la complexité du code javascript, parce qu'il va nous falloir :
- boucler parmis nos objets et exclure ceux qui n'ont pas de lightmaps
- charger les lightmaps existantes
- assigner les bonnes lightmaps à chaque matériau
- effectuer du réglage de base des matériaux pour un affichage correct des lightmaps
Pour être certain que nos objets existent lorsqu'on appelera notre fonction décrite ci-dessus, il va falloir nous placer dans le onSuccess de notre SceneLoader. Exemple avec le code ci-dessous, où le file loaded! ne s'affichera dans la console que lorsque tout le contenu de notre fichier .babylon sera chargé :
BABYLON.SceneLoader.Append(
    "assets/",
    "scene-BJS.babylon",
    scene,
    function(){
        console.log("file loaded!")
    }
);
voir tuto02.html (regardez la console)
On va donc faire nos bouts de code dans cette fonction. Mais avant le SceneLoader, j'ai besoin d'une fonction d'assignation de la lightmap à un material, qui sera appelée ici assignLightmapOnMaterial.
Voici donc la chose :
function assignLightmapOnMaterial(material, lightmap) {
    material.lightmapTexture = lightmap;
    // we want using UV2
    material.lightmapTexture.coordinatesIndex = 1;
    // our lightmap workflow is a darken one
    material.useLightmapAsShadowmap = true;
}

BABYLON.SceneLoader.Append(
    "assets/",
    "scene-BJS.babylon",
    scene,
    function () {
        /** LIGHTMAP ASSIGNATION PROCESS **/
        // lightmapped meshes list
        var lightmappedMeshes = ["wallz.000", "furnitures.000"];
        // we start cycling through them
        for (var i = 0; i < lightmappedMeshes.length; i++) {
            var currentMesh = scene.getMeshByName(lightmappedMeshes[i]);
            // lightmap loading
            var currentMeshLightmap = new BABYLON.Texture(
                "assets/lightmaps/" + currentMesh.name + "_LM.jpg",
                scene
            );
            currentMeshLightmap.name = currentMesh.name + "_LM";
            // we start cycling through each mesh material(s)
            if (!currentMesh.material) {
                // no material so skipping
                continue;
            } else if (!currentMesh.material.subMaterials) {
                // no subMaterials
                assignLightmapOnMaterial(
                    currentMesh.material,
                    currentMeshLightmap
                );
            } else if (currentMesh.material.subMaterials) {
                // we cycle through subMaterials
                for (var j = 0; j < currentMesh.material.subMaterials.length; j++) {
                    assignLightmapOnMaterial(
                        currentMesh.material.subMaterials[j],
                        currentMeshLightmap
                    );
                }
            }
        }
        /** END OF LIGHTMAP ASSIGNATION PROCESS **/
    }
);
Si vous souhaitez faire usage du copier-coller sans analyse, ne vous concentrez que sur cette partie : var lightmappedMeshes = ["wallz.000", "furnitures.000"]; où il vous faut renseigner le nom de vos meshes à lightmapper.
Evidemment sur une scène avec des dizaines ou centaines d'objets il vous sera impossible de maintenir une telle liste manuellement, mais automatiser tout ça rendrait le code moins compréhensible pour un néophyte du javascript, j'ai donc fait ce choix pour ce tutorial.

voir tuto03.html
Bon alors on se rend vite compte ici qu'il manque un réglage sur notre rendu. Quand on a activé le paramètre useLightmapAsShadowmap dans nos matériaux lightmappés, on a l'ambientColor de la scene qui agit en multiply. Ainsi, si cette couleur est grise, la plus haute valeur d'ambient de nos matériaux, même si celle-ci est blanche, sera grise aussi (clampée par la scene.ambientColor).
On passe donc cette ambient en blanc, dans notre sceneLoader :
scene.ambientColor = BABYLON.Color3.White();

voir tuto04.html
Vous aviez peut-être déjà placer une pointLight dans Blender ? (Creez-en une si non) Celle-ci est bien exportée et agit déjà sur vos matériaux, sur les diffuse & specular color :
| Blender |
BabylonJS |
 |
 |
Tout comme les matériaux, le plus vous préréglez dans Blender, le plus simple c'est. Pour des réglages plus avancés, vous devriez comprendre comment faire une fois la partie sur les réglages matériaux effectuée.
Pour connaitre tous les paramètres qui nous sont accessibles, comme d'hab'... il faut regarder la doc'. N'oubliez pas que le plus simple est d'utiliser les paramètres accessibles directement via Blender.
Ainsi donc, comment accèder à un matériau en javascript ? Tout d'abord, nous allons lancer l'outil Inspector, qui va nous permettre d'accèder à des réglages de scène avec une UI.
On va donc placer l'appel de cet outil à la fin de notre fonction de sceneLoader :
[...]

        }
        /** END OF LIGHTMAP ASSIGNATION PROCESS **/

        /* tools */
        scene.debugLayer.show();
    }
);

[...]
Mettons qu'il nous tienne à coeur de passer notre mur blanc en rose. Il nous suffit d'aller dans l'onglet Material, de trouver notre matériau (utiliser le Filter by name...), de trouver notre ambientColor et de la régler.

Vous rechargez alors votre page pour vérifier que ça soit bien pris en compte... et là c'est le drame : évidemment, notre réglage s'est perdu en route.
On va donc créer une variable javascript correspondant à notre matériau, et lui assigner en dur notre paramètre :
[...]

        }
        /** END OF LIGHTMAP ASSIGNATION PROCESS **/

        var wall01Mtl = scene.getMaterialByName("scene_BJS.wall01.000");
        wall01Mtl.ambientColor = new BABYLON.Color3(0.87, 0.2, 0.57);

        /* tools */
        scene.debugLayer.show();
    }
);

[...]
Et hop ! on est bon.
voir tuto05.html
Alors vous me direz "Oui mais l'ambientColor on peut la régler sans s'emmerder directement dans Blender non ?", et vous aurez raison, c'était juste pour avoir un paramètre visuel pour le tuto.
La démarche est juste identique pour n'importe quel paramètre, ici en consultant l'API sur l'ambientColor j'ai pu voir que BJS me demandait de lui fournir une Color3, dont acte.
Imaginons que je veuille supprimer une lightmap sur un matériau d'un de mes objets lightmappé ?
scene.getMaterialByName("scene_BJS.wall01.000").lightmapTexture = null;
ici je n'ai carrement pas créé de variable contenant le matériau, c'est probablement une mauvaise pratique
Mes normalMaps ont été générées en norme DirectX et non OpenGL ?
for (var k = 0; k < scene.materials.length; k++) {
    scene.materials[k].invertNormalMapY = true;
}
là on boucle carrement parmis tous les matériaux de la scène
Avant de finir ce tuto, une micro-astuce pour vous que vous puissiez facilement simuler un semblant de reflection sans pour autant pêter les perf' : l'utilisation d'une spheremap. C'est une technique qui date de Mathusalem en 3D temps réel et qui donnera vite un aspect cheap, mais sur des surfaces courbes (comme la céramique de notre lampe) aura un effet convenable. Prenez juste un screenshot de votre scène BJS et appliquez un effect de sphérisation :

filtre de sphérisation sous Gimp
Puis dans Blender, assignez votre texture sur votre matériau et passez le Mapping en Spherical.
Support du tactile
Pour s'assurer une bonne compatibilité des dispositifs tactiles, ils nous faut ajouter une librairie javascript nommée PEP.
Téléchargez la version minifiée ici, placez-là dans le dossier BJS/js/ puis appelez-là dans la balise <head>.
Il vous faudra aussi ajouter touch-action="none" dans la balise <canvas>
<!doctype html>

<html>

<head>

    [...]

    <script src="https://www.nothing-is-3d.com/js/babylon.js"></script>
    <script src="https://www.nothing-is-3d.com/js/pep.min.js"></script>

    [...]

</head>
<body>
    <canvas id="canvas" touch-action="none"></canvas>
Et voilà, vous avez le support du tactile.
Les post-processes
Si vous le souhaitez, vous pouvez ajouter des post-processes, je vous laisse lire la doc' officielle. Sur ma démo présentée en début de page, j'ai juste utilisé un glowLayer, en plaçant à la fin de ma fonction SceneLoader ce bout de code :
var glowLayer = new BABYLON.GlowLayer("glowLayer", scene)
Je ne vous ais pas mâché tout le travail dans ce tuto, ni détaillé chaques opérations effectuées, mais vous devriez pouvoir arriver à ce résultat sans trop de difficultés:
voir tuto-final.html
Bien entendu, jettez un oeil sur les sources fournies en début de tutoriel.
Ce tuto m'a demandé plusieurs heures de travail, si vous souhaitez me payer une bière 🍻, c'est par ici ;)
Voici quelques pistes & astuces en vrac pour tendre vers la classe ultime :
- ajouter du contraste sur les lightmaps avec une passe d'ambient occlusion
- ajouter des post-processes (mais attention : une scène 3D temps réel doit toujours être belle même avec ceux-ci désactivés)
- apprendre javascript : évidemment quand on parle de webGL, le plus on connait javascript, le mieux on va s'en sortir
- apprendre python afin de pouvoir automatiser des taches chiantes sous Blender, exemples :
- assignation auto du
_cycles_default_ on link obj, voir même autoconvert du material courant (pour avoir le naming conversé)
- relink automatique des matériaux cycles configurés, utilisation de Data ou Obj pour l'assignation mat'
- possibilité d'automatiser des taches comme le baking (sans passer par un plugin externe)
- améliorer des addOns qu'on utilise (et y pousser ses suggestions et modifications bien entendu)
Logiciels
Les logiciels et addOns utilisés sont :
-
Blender 2.79b, avec ces addons:
- exporteur BabylonJS 5.6.3
- le workflow du texture baking de base de Blender est tout pourri, c'est pourquoi je me suis acheté l'addOn Baketool, que j'ai utilisé ici. Notez qu'il est possible que les addOns gratuits suivants peuvent vous être utiles (je ne les aient pas tous essayés, n'hésitez pas à m'en suggérer d'autres) : TexTools, BRM-BakeUI, Principled-Baker.
- Materials Utils Specials (par défaut)
- Layer Management (par défaut)
-
BabylonJS 3.3.0
-
Gimp 2.10. Je trouve Photoshop bien plus pratique, mais je n'ai pas de licence personnelle. Donc pourquoi ne pas profiter de l'écriture de ce tuto' pour tenter de mieux le maitriser. Krita vaut son test aussi.
-
EasyPhp Devserver 17.0 pour le server web local
-
Quelques éditeurs de code en vrac :
-
et pour écrire et préparer ce tuto, en vrac :
- Typora, éditeur léger en markdown
- ScreenToGif, capture d'écran et éditeur de gif
- Greenshot, capture d'écran et édition rapide
- XnView, visualiseur d'images et traitements rapides
- OBS Studio, capture d'écran en vidéo
- Moukey, affichage des actions claviers & souris (d'ailleurs, si vous avez mieux ?)
Ressources
- 2018-10-08:
- ajout du changelog
- ajout de la partie Finitions (tactile, post-processes)
- mise à jour du zip des sources

 version française disponible)


 english version available